Roz Ka Khana

A blog about everyday food. Mostly Indian. All vegetarian.

Archive for the category “Raw foods”

Snappy Salads – Lemony Kale Salad

This catchy title from MindBodyGreen caught my eye recently. “A Salad That Makes Even The Skeptics Fall In Love With Kale”:). So there it was. My next salad inspiration. I took this for lunch last week and am not being cliched when I say “I licked this salad clean.” Yes. This is the best kale salad I have tried. And in making it I also discovered how the natural flavors of kale can be accentuated.

The secret to making the perfect kale salad is this – Massage that kale. Use your bare hands. I think what makes kale salads so gratifying is that you literally use your senses to make it. No tongs, no fancy equipment, just roll those sleeves and use your fingers to press the kale leaves and rub them together. With or without the dressing.The process of massaging apparently breaks down the cellulose in the kale leaves and makes them soft and pliable, so when you douse them with dressing and any other flavors they take to them easily. I already have a kale “fetish” thanks to the oodles of green smoothies I have been consuming but this just took my kale love to new heights.

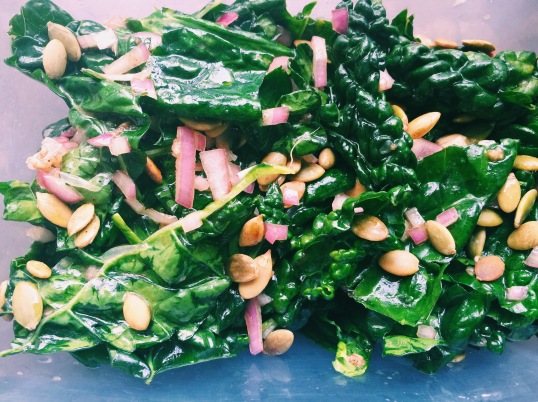
Note: The pictures don’t do enough justice to how delectable this salad is, and the fact that I didn’t slice the onions didn’t help to make it look as appetizing as well but this is one time I will guarantee it is worth the try. You will begin to LOVE kale:). Oh and did I mention this goes very well with Indian dishes too.

Enough gushing I suppose, here’s the recipe.

Serves 2 to 3 people
Prep Time: 20 minutes

Ingredients

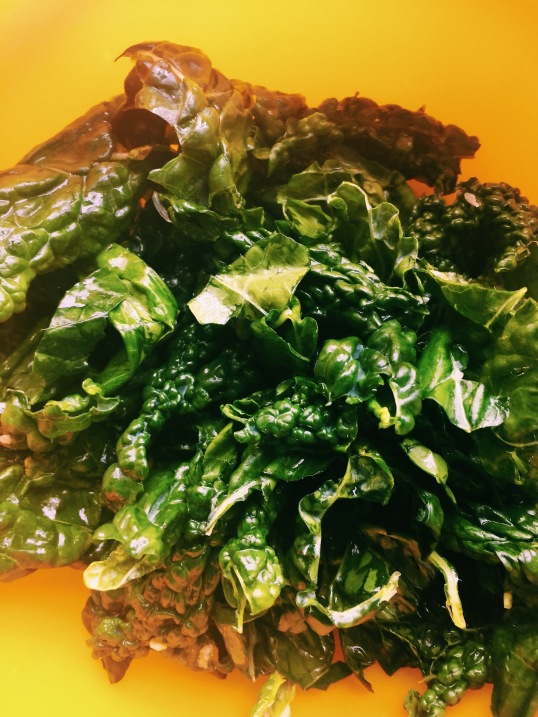
  • 2 bunches Lacinato kale (also called “Tuscan” or “Dinosaur” kale)
  • 1-2 lemons, squeezed
  • 3-6 cloves of garlic, crushed
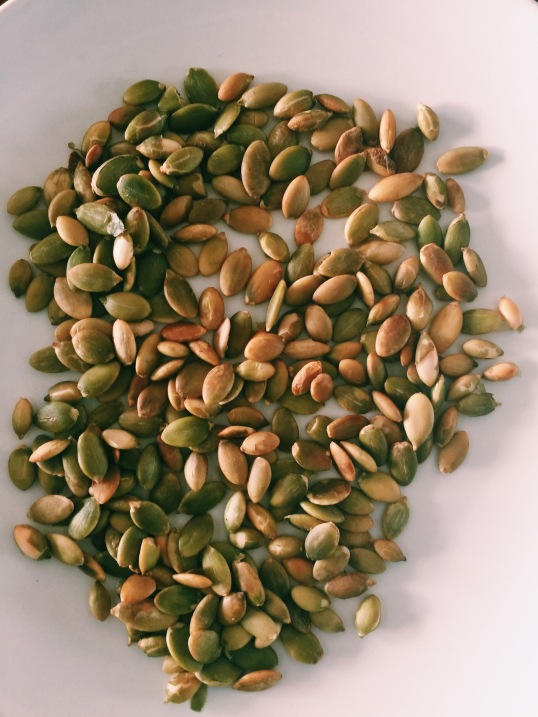
  • Half cup of pumpkin seeds
  • 1 large white onion, sliced thin. I used red onion and chopped it fine and it was equally good so depends on how strong you like your onion flavors.
  • Olive Oil, to taste
  • Balsamic vinegar, to taste
  • 1/2 tsp sea salt
  • 1/2 tsp pepper

Method:

  • Thinly slice the onion.
  • Take the crushed garlic into a bowl, and combine with salt and pepper. Set aside.
  • Add the sliced onions to the mix, douse with a healthy amount of olive oil and balsamic, mix well and set aside to marinate.

IMG_0902.JPG

  • Take the kale and strip the leaves off the stem. (You can check this video from Marin Mama Cooks on how to prep the kale). Break the leaves into bite sized pieces into a salad bowl.

IMG_0900.JPG

  • Squeeze one lemon directly onto the kale. Now begin to massage the kale, rubbing them together or using whatever technique you like, but ensure that the leaves get coated well. The kale will reduce in size and become smooth. You may taste the leaves here. If you still find them to be bitter, then add more lemon and keep massaging till the taste gets all lemony.

IMG_0899.JPG

  • Now heat a skillet and add the pumpkin seeds. You may add some coconut oil to the skillet to roast the seeds or just roast them dry. Once the seeds turn golden, remove the pan from the heat and let cool.

IMG_0903.JPG

  • Now add the marinated onions into the kale bowl, and throw in the cooled pumpkin seeds. You can massage the leaves again to ensure the leaves are coated well with the dressing. You may also add more salt, pepper, oil, or lemon until you find that perfect flavor.

IMG_0901.JPG

I had saved some leftovers at home but the salad was gone before I could try it again for dinner. The original recipe says that this salad only gets batter with age so keeping it in the refrigerator and eating the next day will enhance the flavors of the citrus and kale even more.Sadly we didn’t have any left to try this but that’s a good problem to have I suppose:).

Snappy Salads – Cucumber, Tomato and Feta, a Watercress Slaw , Home Made Dressings and more

After a week of binge desserts, festival food and family gatherings for Diwali post a whirlwind trip to India, I needed to quickly get back on the real food wagon. Oodles of sweets and savories, jaggery laden manoharams, murrukkus, gulab jamuns– top these with food coma induced naps countered with jet lag and a crazy road trip, and I was back to needing another vacation.

It’s amazing how your body begins to tell you (more like when you listen to it:) when you fall off the wagon and what it needs to get back on track. For the 10 days that I was filling my body with whatever was in front of me, it showed in my energy levels and my skin. I returned with breakouts, allergies, sinus headaches and all that I thought I had left behind months ago. Not that I wasn’t eating sweets and such in general – I‘m a big believer of eating everything in moderation, but a healthy balance of exercise and greens was doing the trick so far for me. It has now taken a full 10 days to get my schedule and energy back with my favorite green smoothies, juices, and greens.

So I figured I would get started with updating my salad repository or rather actually trying the many salad recipes I have stored in my Evernote files. I’ve been an avid user of Evernote of late, on my desktop and phone. I find it extremely useful when I’m browsing through my various news feeds and find anything that catches my eye, and this could be a list of books, articles, quotes, anything that tickles my funny bone and my palate. The best part – I can sync my notes with my tablet and phone and access my notes anywhere. So I have collected over 450 notes so far, more than half of which are recipes of course. I find this very handy when I’m planning my weekly lunch and dinner menus to pick from the various folders that I have saved recipes into- it’s a virtual cookbook that I can access from anywhere 🙂

This week, we had watercress and carrot slaw with home-made orange vinaigrette, and vegetable soup (with sandwich for those who wanted some extra heavy carbs) for dinner on Monday night. Today I toted along a cucumber tomato feta salad for lunch. You can use the second salad as an accompaniment to an Indian meal if you leave out the feta.

I used a useful gadget called the Salad Zinger to make the orange vinaigrette and it was amazing. Recommend the buy if you’re a gadget freak like me;) though you can still make it in your good old blender.

IMG_0795.JPG

Here are the recipes.

Watercress, green apple and carrot salad/slaw (Serves 2)

  • Watercress – a big bunch, chopped
  • Red cabbage – 1 /4 , grated
  • Carrots – 2, grated
  • Cherry tomatoes – 6-7, halved
  • Green apple – 1, grated

Orange vinaigrette dressing:

  • Navel oranges – 1, deseeded and quartered
  • Red onion, a small slice
  • Parsley, a small bunch about 1/8 cup
  • Garlic pod – 1
  • Olive oil – ¼ cup
  • Red wine vinegar – 2 tbsp
  • Honey – 1 tbsp

For making the vinaigrette in the Salad Zinger, you will need to fill the first 4 dry ingredients in the bottom half of the gadget and screw the blades and bottom back on. Fill the top part with the liquid ingredients, shake the contraption and let the juices from the orange, onion mixture seep into the olive vinegar mixture. Let it sit for at least a half hour before adding to the slaw.

IMG_0794.JPG

Alternatively you can coarsely chop the first 4 ingredients in a blender, add it to a bottle and fill the bottle with the wet ingredients. Let steep for a half hour before serving.

Take the grated veggies in a bowl. Add the dressing and toss to combine.

Cucumber, tomato and feta salad

Ingredients:

  • 3 cups of cucumber, coarsely chopped
  • 7-8 cherry tomatoes, halved
  • Mint leaves, 2-3 tbsp, chopped
  • Scallions, 2, chopped with the leaves
  • Green olives, ¼ cup
  • ¼ cup feta cheese, crumbled

Dressing:

  • Lemon juice, 1 tbsp
  • Olive oil, 2 tbsp
  • Salt and pepper to taste

Method:

Mix the cucumbers, tomatoes, scallions, mint in a large bowl. In a separate bowl, whisk together the lemon juice and olive oil and season with salt and pepper. Go easy on the salt as feta is salty by itself. Pour the dressing over the salad, toss and sprinkle the crumbled feta before you serve.

IMG_0818.JPG

Snappy Salads – Taco Salad in a Jar

Salads in a Jar is probably another Pinterest favorite but it was actually a Huffington Post article that caught my fancy this week. The article was about colorful salads and fruits to make for a not so sad desk lunch. Couldn’tbe more timely as I was on a gluten-free/clean eating binge this week again after all the “junk” devoured over the past week and weekend.

My hurried clicks with my Iphone camera while I was making this salad didn’t come close to the vibrant colors in the original article, but it was a decent first attempt to inspire me to eat healthy at work and stop my binges in Singapore “dhaba” type eateries and food courts. I have to admit, this is by far the most convenient method to tote a salad to work, greens stay fresh, its healthy, compact and the dressing gets evenly mixed when its time to eat. All you need to do is turn the mason jar upside down and shake it a few times and you have a wholesome green colorful meal. And yes its snappy too!

After my smoothie obsession (that continues), salads may come a close second to slowly becoming an everyday habit.  Both smoothies and salads use my favorite kitchen utensil…the versatile mason jar. Not that ubiquitous in Singapore, you can find mason jars at wholesale Chinese kitchen stores in Chinatown or at Japanese dollar stores (Daiso). I do miss the “Ball” mason jars I used to collect at Walmart and Amazon but these aren’t too bad. Of course there’s always the pasta sauce/pickle jars that can be reused so it’s not hard to get started. You can also make the dressing and the fresh salsa ahead of time and keep it handy to whip up other tasteful mason jar salads.

20140619-114804-42484780.jpg

Taco salad in a mason jar

Couple of points to note when making salads in a jar:

  • Use mason jars that have a wider mouth than those you use for smoothies. Helps to mix and eat out of the jar if necessary.
  • Put the dressing in first and then add in other ingredients, Beans, harder veggies or fruits at the bottom and the softer ones on top. The salad leaves should be top most so they stay fresh.
  • Experiment with different veggies, fruits, beans and dressing.
  • Use homemade dressings as much as you can. Store bought ones not only have processed ingredients but are also calorie laden so nothing like blending some fresh dressing with fruits, veggies, olive oil or other on your own. I will share some dressing recipes frequently in this section as well so keep a look out.
20140619-114804-42484094.jpg

Taco salad prep

Ingredients:

For salad:

  • 1/2 cup boiled and drained black beans (soak black beans overnight in water and then cook it the next day in water over a stove or a pressure cooker)
  • 1/4 cup diced green or red bell pepper,or both
  • 1/4 cup sliced green onions or regular sweet Vidalia onions
  • 1/2 cup cooked quinoa or brown rice (I mixed the quinoa with some lemon juiceand cilantro beforehand)
  • 1 small avocado, diced (toss with a little lime juice to prevent browning)
  • 2 Tablespoons fresh Mexican salsa (recipe below)
  • small handful chopped cilantro
  • shredded or sliced lettuce or any leafy greens

For dressing: (can be made 1-2 days ahead) 

  • juice of 1 lemon or lime (or about 2 tbsp)
  • 1/2 tsp cumin powder
  • 1 tbsp olive oil
  • Sea Salt to taste

Mix all the above with a whisk and set aside.

For fresh Mexican salsa: (in the Vitamix)– from Vitamix recipes. Can be made a day or even a week ahead)

  • 2 cloves of peeled garlic
  • 5 baby carrots
  • 3 or 4 slices of fresh serrano peppers pending your desired heat level
  • fresh cilantro ( 3 finger pinch)

Turn the Vitamix to variable speed 7 and drop the garlic, serrano peppers, cilantro, and carrots in through the hole in the lid while the machine is running. Next, add the following to the container and put the lid back on:

  • 3 roma tomatoes (cutting in 1/2 or 1/4’s will make it easier for the blades to grab the tomatoes)
  • 1/4 inch slice of sweet yellow onion (larger onion) or a 1/2 inch on a smaller union
  • 1 thin slice of green bell pepper
  • Season Salt (2 or 3 shakes)
  • Pepper (2 or 3 shakes)
  • Garlic Salt (4 or 5 shakes)
  • Ground Cumin (2 or 3 shakes)
  • Squirt of lime juice

Now, turn the machine on variable 1 or 2 range. The less ripe the harder the tomato and the higher the speed needed to chop), and then use the tamper to push everything down in to the blades! When you can no longer see or feel large chunks of food, then your salsa is ready to devour:)

Method for layering the salad:

Layer ingredients in jar in the order listed- Lemon cumin dressing, black beans, diced pepper, green onions, salsa, quinoa, avocado and end with the lettuce. Top with lid and refrigerate until ready to eat. Can be made 1-2 days in advance.
To eat – turn jar over to let dressing/salsa coat the salad ingredients. You can eat out of the jar or empty it on to a plate. Salad leaves stay fresh and dressing is all evenly coated. Perfection!


20140619-114805-42485616.jpg


Ginger and palm sugar punch (Panakam), Spiced Buttermilk (Neer Mor) and Lentil green mango salad (Kosumalli)

20140411-103815.jpg


This is a bit late for posting a Rama Navami recipe but as with all festival recipes, I record them here for posterity. I’m sure this will come handy in the years to come to me or to another reader so it’s better late than never. As always with all the festival recipes here, these are Amma’s recipes.

Panakam, Neer Mor are not just Rama Navami recipes by the way. While legend goes that this was served during Sita and Rama’s (Hindu mythological God and Goddess for the uninitiated) wedding and during Rama’s birth, the tradition seems to have stuck as these are the post celebration drinks served to this day during most traditional South Indian Hindu weddings and birthdays.

The best part – they are probably some of the easiest festival recipes to make. And they are all raw which means no stove top needed and no messy clean ups so as you can guess this is my favorite festival recipe as well:) (Not counting the tadka/seasoning to the buttermilk of course where there is some stove top heating involved, but that step can be skipped if you’d like it to be completely raw. I recommend adding the seasoning as that adds the real traditional South Indian taste)

The panakam can easily pass off as a summer cooler punch the next time you have a summer lunch  get together. Its sweet but the ginger and lemon give it the apple lemon tea kind of zing and tart taste, perfect for a hot day.

And the neer mor (moar) or light buttermilk spiced with ginger and curry leaves is the perfect coolant for a hot summer outing in the sun. “Buttermilk cools the system” as my Appa (dad) says- this is still his go to drink when he returns home from his trips to the vegetable market. And according to him the secret to his “zen”:)

Recipe for Panakam:

  • 1/2 cup palm sugar or jaggery
  • 1 tsp dry ginger pd
  • 2 cardamom crushed (you may add the skin as well for flavor but we used only the crushed seeds)
  • 1 tbsp lemon juice (optional)
Method: Powder the jaggery in a bowl, add about 1 1/2 to 2 cups of water. You can add or reduce the water depending on how sweet you like the punch. Strain the water to remove any sediments from the jaggery mixture.
Add dry ginger pd, and cardamom pd .Mix well. Add lemon juice. Serve cold or at room temperature.
Recipe for Neer Mor :
20140411-103825.jpg
  • Yogurt -1/2 cup.
  • Water 1 1/2 cups 
  • Asafoetida -1/4 tsp
  • 1-green chili crushed,
  • few curry leaves
  • salt to taste
  • seasoning -1 tsp mustard seeds , 1/2 chopped green chilli.
Beat the yogurt in a bowl and mix with water. Mix the asafoetida & salt with little water separately. Add this to the beaten yoghurt. Crush the curry leaves and add.
For seasoning the buttermilk, heat 1/2 tsp oil in a small kadhai or heavy bottomed vessel, When the oil is hot, add the mustard seeds. Wait till it splutters then add the crushed green chili (optional). Pour this onto the buttermilk. Mix well.
20140411-103932.jpg
Recipe for Kosumalli or Kosambri (Raw moong dal, green mango salad)
  • 1/2 cup Indian yellow moong dal (skinned and split green gram)
  • 2 green chillies
  • 3 tbsp grated coconut
  • 1/2 raw mango grated
  • /1/2 cucumber cut in to very small pieces
  • salt to taste
For seasoning – 1/2 tsp mustard; 1 green chili crushed (optional)1 tsp oil, asfoetida – a pinch, a handful chopped cilantro
20140411-103843.jpg
Wash & soak the moong dal for about 1/2 hr till it gets a bit soft. Drain the water, add salt, add the chopped cucumber and grated mango and coconut.
For seasoning, heat the oil, add mustard seeds. When they splutter add the crushed green chili, asafoetida. Add this to the moong dal salad. Garnish with cilantro. You may also add 1 tsp of lemon juice if needed.
20140411-103912.jpg

Fresh, Raw Summer Rolls with Chili-Peanut dipping sauce

20140319-142221.jpg

This was actually a Pinterest recipe that caught my eye at first but then I promptly forgot about it after adding it to my many recipe boards. Question for all your social media consuming foodie geeks – how do you keep track and organize the many recipes and food tips you pin, tag, instagram, stumbleUpon, Read it Later, save on Pocket, Evernote and whatever else you use to file recipes these days? I just glanced through my pins and bookmarks and I have enough recipes to menu plan for an entire year, without repeating any of them! But they are in dire need of organization and focus –  which one of those 10 spelt flour choc chip cookie recipes was THE one that got me ” the best-est cookie ever” badge from my foodie son? (Yeah I know I do manage to try some strange recipes:). I’m still not sure after trying out 4 other recipes and am not close to the original one:(

So send in your tips and suggestions. Of course the easiest method would be to record the best one here, so here goes…

I chanced upon this recipe again at this awesome blog called The Simple Veganista and the presentation and simplicity of this was enough to pull me in. I tried it for dinner last night and was impressed by how simple and yet how flavorful it was. This one is a keeper.  The recipe is modified slightly here as I used the ingredients I had (skipped tofu and added sprouts and kale) but it’s quite a forgiving recipe and I’m sure will taste good with whatever veggies you use.

Fresh, raw, healthy and very simple. Those should be good enough for anyone to try them I’m sure. The dipping sauce takes about 5 minutes to whip up. Have these summer rolls with a bowl of hot soup or any cold gazpacho and you have a balanced and healthy meal.

Ingredients:

  • 5 rice papers (I used circular sheets)
  • 3 medium carrots, cut into match sticks
  • 1/2 cucumber, cut into match sticks
  • 1/2 bell pepper green, thinly sliced
  • 1/4 red cabbage, thinly sliced
  • kale, pea shoots
  • radishes, thinly sliced
  • mung sprouts
  • mint leaves, a handful
  • basil leaves, a handful

Method:

  • 1. Dip the rice paper in a flat bowl of warm water (the water should be warm,not boiling but not lukewarm either). Soak untilyou feel the paper soften and begin to get translucent and a bit sticky.
  • 2. Layer the veggies -I added kale first, then pea shoots, carrots, bell peppers, cucumbers,sprouts and then mint or basil.
  • 20140319-142205.jpg
  • 3. Roll the paper tightly around the veggies and continue to roll until you get a tube of tightly rolled veggies in rice paper.
  • 20140319-142159.jpg
  • 4. Cut them in half and serve with dipping sauces of your choice.
  • 20140319-142229.jpg

Peanut chili dipping sauce: (this is exactly as on the blog except that I added additional red chili flakes.You can also add fresh thai red chili if needed)

This makes 2 servings.
  • 3 heaping tbsps peanut or almond butter (I mixed 2 tbsp of peanut and 1 tbsp of almond butter)
  • 1 tbsp tamari, Bragg’s liquid aminos or soy sauce
  • 2 tbsp maple syrup
  • 2 tbsp warm water
  • 1 – 2 tbsp rice vinegar, optional
  • juice of 1 lime
  • 1-2 tsp red pepper flakes, optional

Mix all the above with a small whisk or fork until it blends together. You can make this ahead of time and store in the refrigerator.

Snappy Salads – Baby Spinach, Red Onion, Orange and Feta Salad with a Sweet Citrus Dressing.

20140225-125333.jpg

This is a quick post for a snappy salad that I packed for lunch this morning. This week is fridge clean out week after days of entertaining and multiple grocery visits. Let me also add that it’s also a “clean eating” week for much the same reasons:). That is quite a challenge when you have pints of ice cream, chocolates and wine as party leftovers in the fridge but I did want to try.

This week’s resolve was to pack my lunch as often as I could and this salad was the easiest I could mix up with the clean-er items in my fridge and pantry. Some farmer’s market marmalade, rice vinegar and olive oil and I had a sweet citrus dressing. Truly snappy.

Ingredients:

3 cups of baby spinach

1 cup chopped romaine lettuce

2 small mandarin oranges

1/2 cup pecans chopped

2 tbsp feta crumbled

1 small red onion sliced

Dressing:

1 tbsp orange marmalade

1 tsp rice vinegar (or red wine vinegar)

1 tbsp olive oil

You may also add some orange juice if you don’t have marmalade handy. As I said I was cleaning out my fridge:)

Salt and pepper to taste.

Mix all the above with a fork or small beater. Makes enough for 1/4 cup, enough for one salad.

Method:

Mix all the ingredients for the salad. If you’re packing it for lunch, keep the onions and the feta in separate containers and only mix them before you are ready to eat. Add the dressing, toss and enjoy!

20140225-125519.jpg

The 30 Day Green Smoothie Challenge begins October 1!

20130930-091521.jpg

I mentioned earlier that green smoothies have been quite life changing for me. I’ve noticed some remarkable changes in my health even since I started to juice and blend every day. The Vitamix blender and the Hurom juicer are a countertop staple in my kitchen despite limited counter space. I have realized that having them at eye level keeps it top of mind – I now use them both every single day, sometimes more than once a day.

I’ve had several sources of inspiration as I mentioned earlier – the movie and site of Joe Cross’s reboot, Pushita’s The Rawsome Life, Kimberly Snyder’s Beauty Detox and more recently Simple Green Smoothies. The last one has been a go-to for all things smoothies, especially the green kind. I tried their first 30 day challenge a few months ago and am now hooked. I start my morning with a daily glass of warm water with lemon, and then it’s usually a green smoothie for breakfast. I may or may not have additional toast or oatmeal – it depends on how full I feel after the smoothie and they are usually quite filling. Of course I’m hungry in about two hours for a mid morning snack so while I’m eating more frequently it’s actually helped with my energy levels.

This ritual has helped in more ways than one:

  • My energy levels have increased significantly – I don’t feel the need for caffeine any more in the morning – I have cut out morning tea or coffee except for an occasional afternoon cup of green tea or herbal tea
  • My skin has noticeably improved – what used to be very acne prone is now relatively smooth and on weeks I eat right it actually does have a sheen, not due to oil but a brightness to it:)
  • My eyesight has improved –  this took me a few validations from 2 different eye exams – but in my opinion the juicing of carrots has actually helped. My prescription has dropped a full 0.5 points.
  • Has helped with more than  my daily intake of fruits and veggies.
  • Has helped with toning and losing a few pounds – small but noticeable.
  • Has helped with immune support – my sinus issues have cleared up.

And so when Simple Green Smoothies announced they would start their next 30 day challenge – I was of course all set. Only this time I wanted to share my progress so hopefully we can do this together:)

If you are interested in joining and supporting me on this challenge please follow me on my Tumbl-og, FB and on Instagram to get daily updates, weekly shopping lists and recipes. Of course go ahead and sign up with Simple Green Smoothies too, the creators of this challenge.

Feel free to share your experiences and any green smoothie recipes that have worked for you as well.

Getting Started with the Challenge: (adapted from Simple Green Smoothies)

The goal is to help you drink at least one green smoothie a day for the next 30 days…and you can keep it flexible as long as you can make it happen.
 #1: Drink at least one green smoothie per day (1 green smoothie = 16 ounces). The recipes make 2 servings— so you can share with a friend,  save the other half for a snack or half the recipe.
#2: Keep eating regular meals. If you’re trying to shed some pounds, you can substitute a green smoothie for a meal. In general maintain a healthy diet – no heavy fats, fried stuff, avoid sugary stuff, hydrogenated fats etc. if you want to see a difference in your weight and in your overall health.
#3: Read the weekly shopping list and daily recipes on either of those sources mentioned above.
#4: Be adventurous! Buy those mustard or collard greens at the farmer’s market! Throw in some coconut oil! Sprinkle the top with chia seeds! You can be flexible with your smoothies.
#5: Buy fresh veggies and organic as much as you can. Be sure to wash the greens and fruits well especially if they are non organic to wash off the pesticides.
#6: The green smoothie general recipe is greens (1-2) + fruits (1-2) + herbs (1-2) + liquid base (coconut water or almond milk or water) + superfood (optional – chia, flax, spirulina etc)
#5: Blend your heart out! Any blender will do as long as you are consistent and use it a lot.

Happy smoothi-eing. You will notice that one green smoothie a day will transform your life as well, and hopefully help you drop a few pounds if you need to.

Here is the shopping list for the 1st week that I will share here and in all the other places of course. The things you will need other than the list are a good blender (I find the best ones to be Vitamix or the Blendtec if you are looking for suggestions but have found any blender to do the basic trick).

Note that this list makes about 4-5 cups or 2 servings of smoothies a day for 2 people so feel free to halve if you want to make less. Also note that you may use any greens (if you don’t have kale available for example use any local greens and any liquid base.

Shopping list for week 1:

FRUITS:
  • 6 bananas
  • 6 oranges
  • 1 pineapple, fresh or frozen
  • 2 apples
  • 4 pears
  • 1 avocado
  • 1 package mixed berries
  •    (strawberries, blueberries, raspberries)
  • 1 lemon
  • 1 small bag grapes 
VEGGIES: 
  • 1 small bag spinach, fresh (10-16 ounces)
  • 1 small bunch kale, fresh
  • 1 bunch basil, fresh

OTHER (LIQUID BASE):

  • Almond milk, unsweetened
  • Ginger root
  •  Coconut water
OPTIONAL (yet recommended!):
  • Chia, flax seeds
  • Elderberry extract
  • Probiotics
  • Spirulina powder

You may substitute the fruits as you like but try to keep it within the same family of stone fruits, melons, berries etc. For instance you can substitute oranges with grapefruit or clementines. Pears with green apples or maybe even guavas etc.

Also those are frozen berries in the picture – you may use fresh or frozen.

Stay open minded, flexible and watch that transformation happen!

Mango Coco Loco Smoothie

20130506-170115.jpgThis is a quick post and a quick way to use up all those juicy Alphonso mangoes filling up in my kitchen (and our tummies) this season. There are a gazillion mango dessert recipes out there that I’m dying to try, but what better way to use up some overripe mangoes than in a hearty and nutritious smoothie. Made with the goodness of coconut water and avocados and oranges , this one has a chock full of electrolytes, healthy fats, Vitamin C and is a filling smoothie and great breakfast by itself.

Of course if you’re like me, don’t bother chopping the mangoes – just squeeze the heck out of them with your fingers into the blender – then enjoy savoring the sweet goodness of the seed with bits of the pulp and juice trickling down your fingers:). That is by far my favorite way to enjoy a mango.

Ingredients: (makes 6 cups)

  • Aphonso mangoes (or you can use any sweet ripe mango) – peeled and chopped into chunks – 2
  • Avocado – 2
  • Oranges – peeled and cut into big chunks – 2
  • Coconut water from one tender coconut – 1 to 1 1/2 cups
  • Coconut meat – 1/4 – 12/ cup (optional)
  • Whey protein powder (optional) – 1 tbsp
  • Ice cubes – 1 cup
  • Water as needed
  • Vanilla paste or pod or essence – 1/2 tsp

Method:

Add all the ingredients in the order listed into a Vitamix or other high powered blender and blend first at a low speed then on high for 1-2 minutes. Add the water as needed to reach the desired consistency.

Lunchbox Series – Vegetarian Black Bean Burger

IMG_0268
This is another Vitamix recipe, though you can make this burger mix in any food processor as well. It’s just that I love to talk about the Vitamix’s versatility and of course put it to all sorts of tests. And it almost always wins me over. I know I’m gushing and it’s silly.  Yes, pity that the Vitamix cannot actually make the patties and sauté them as well, as a friend jokingly asked me:). Well, those are the few things it can’t do (yet) but if Vitamix is truly listening, we may just about have another innovation to make this a true all round kitchen machine.

I sent this for Nikhil’s lunch and let me just say that I now make a batch of beans and freeze them regularly (black or garbanzo or any bean variety soaked and boiled), as this is another lunch box staple and a keeper recipe.

Ingredients:

Small red onion – 1 (cut in half)

Green chili (Thai or serrano) – 1 -2 depending on spice level

Cilantro  with some stem– a small bunch

Soaked and boiled black beans – ¾-1 cup (You may also use 1 can of black beans)

Cumin powder – ¾  tsp or to taste

Garlic – 1 pod

Ginger – 1/2 – 1 inch

Garam masala (available in Indian grocery stores) – ½ tsp

1 tsp olive oil

Corn flour or rice flour – 1tbsp (you may also use 1 tbsp flax seed meal whisked in ½ cup water. The idea is to have some sort of a binding agent and flax seed meal is a good substitute for eggs)

Method:

  1. Start the blender on variable speed 1, then add the red onion, green chili, a fistful of cilantro, ginger and garlic and blend till the onions are very finely chopped.
  2. Add the boiled beans and continue to blend on variable speed 3-5. Use the tamper to mix the ingredients well.
  3. Now add a dash of cumin powder, salt and garam masala.
  4. Add the binding agent (corn flour or flax seed meal). Blend again on variable speed. The mix should resemble a coarse yet blended paste. You can keep this in the refrigerator for a while to help bind the ingredients.
  5. IMG_0266
  6. Shape into patties and cook on a skillet until brown on all sides. You may use 1 tsp olive oil to cook it till it browns well.
  7. IMG_0267
  8. Add your favorite burger condiments and the patty to wheat or multigrain sub bread. Wrap in plastic wrap or foil and pack it away for a healthy lunch:). You can see a green apple, goldfish and a cupcake in this lunch box which is yeah, still quite healthy (depends on the type of cupcake:)
  9. IMG_0264

Guava Greens Juice

This is my #firstpost using #Vine, the new video app from Twitter. Vine allows you to create quick 6 second videos that can be shared via Vine or through Twitter. You do have to have your Twitter account connected to it, so it can also be shared via your Twitter feed. I think it’s the perfect medium for recipes and “how-to” videos. And the simplest recipes are for juices and smoothies of course which is why I chose to use a juicer recipe as my first Vine post. All you need are a few fresh and raw ingredients and that blender or juicer to do the trick.

So here’s the first one for Guava Greens – a juice with a chock full of greens and what I like to call “liquid gold” as it’s so good for you:)

Ingredients:

2 Guavas
1 green apple
1 medium bunch spinach
1 lemon (peeled) – optional
1/2 inch ginger – optional

Method:
Chop the fruits into bite sized pieces. Turn the juicer on and slowly add the pieces to the mouth of the juicer. Drink it fresh or store in a glass bottle or mason jar with a lid in the refrigerator.

With green juices it’s best to drink it as soon as possible. Storing it in a mason jar filled to the top and with a lid helps keep it for a few hours in the refrigerator without oxidizing too much. If you are using a centrifugal juicer, do make sure you drink it quickly to prevent quicker oxidation.

Let me know how you find these bite sized videos. If you like these, follow me on Twitter as well @rozkakhana

Post Navigation