Roz Ka Khana

A blog about everyday food. Mostly Indian. All vegetarian.

Archive for the category “Beans”

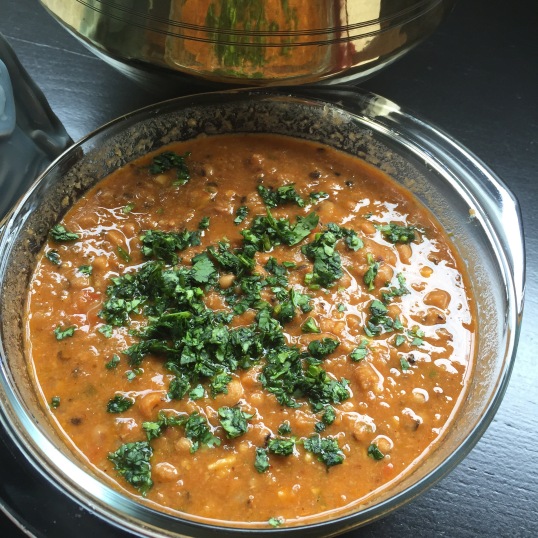
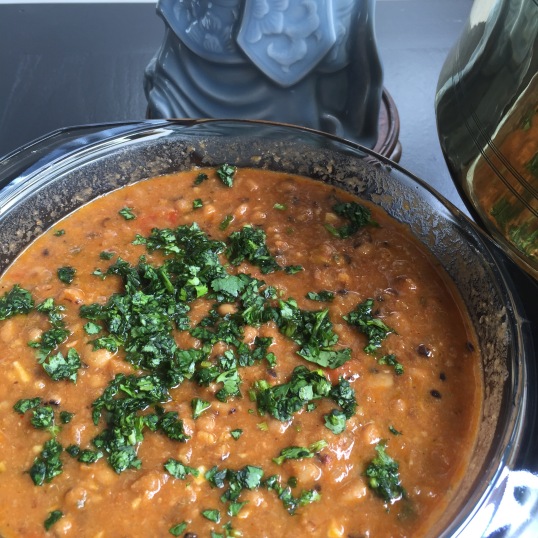
Black-Eyed Beans (Lobhia) with Tomatoes

IMG_1673

This recipe has universal appeal because it blends techniques and tastes that are popular across cuisines. The dish pairs as well with a crusty batard or flat bread as with steamed rice and because it uses so few ingredients, is a breeze to put together.

The only mildly challenging part is cooking the dried black-eyed beans, or lobhia as they are called in Hindi. You’ll have to soak the beans in water first and allow for some generous cooking time. Of course, you could always use canned black-eyed beans, in which case this will be ready in a jiffy.

The dish improves with keeping so it’s a perfect make-ahead if you’re planning to entertain.

You could serve it on its own with tortillas and french bread or you could add some cheese and pop it under a hot grill before bringing it to the table. Alternately, top the dish with some roasted bell peppers or lightly sautéed strips of capsicum.

Ingredients:

Serves 2-3

  • 1 cup dried black eyed beans or two 410g (14 oz) cans of cooked beans
  • Onion – 2 medium, finely chopped
  • Tomato – 4 medium, skinned and finely chopped, or a can of peeled tomatoes, drained and chopped
  • Garlic – 4-5 cloves, finely minced
  • Cumin seeds – 1 tsp
  • Chilli powder or minced fresh green chillies (optional, to taste)
  • Garam masala – ½ tsp (optional)
  • Olive oil
  • Salt as needed
  • Butter (optional)

Method:

  • Soak the beans in water for about four hours.
  • Rinse, cover with plenty of water, and bring to a boil. Lower the flame and let the beans cook, stirring occasionally and adding more water so that there is always an inch of liquid above the beans. This could take about an hour and a half or slightly longer. Alternately, if you have a pressure cooker, cook the beans for about 10 minutes under pressure. Do not discard any excess water. If you are using canned beans, rinse thoroughly under running water and drain.
  • Mash a few cooked beans to thicken the gravy.
  • Heat the olive oil in a wok or pan and when hot add the cumin seeds and let them sizzle for a second or two.
  • Add the finely minced garlic cloves and fry for a few seconds.
  • Add the onion and fry on medium heat for about five minutes until they start to change color.
  • Add the fresh or canned chopped tomatoes and fry until the moisture evaporates and the mixture is homogenous.
  • Add the chilli powder and garam masala, if using, and fry for a few seconds.
  • Add the cooked beans, salt and some water if necessary, cook for about 10-15 minutes until the mixture thickens.
  • Add pats of butter and serve.

IMG_1675

“The Rajma” – Indian Spiced Vegetarian Chili

IMG_1816This is my all time favorite comfort food. Being a Tambrahm family Rajma (red kidney bean curry) wasn’t really a dish we had every other day. My dad would actually make a face and ask “what kind of dish is called Rajammal?”

So I actually only had this dish for the first time when I was 4. And the fact that I remember it says a lot:) We were living in Srinagar back then, yes the Jammu & Kashmir Srinagar which is the farthest back I can remember of my childhood. We were friends with this warm and kind hearted Punjabi family next door and Badi Ma (grandma) would make the best rajma ever. I would live in their home reveling in all the finger licking Punjabi food- kaali dal, kadhi and rajma. So you could say this Tambrahm girl got her loyalties all mixed up – rasam wasn’t so much my comfort food as was rajma. And it still is, to this day. This is one dish I could literally eat every day and not get bored. Well, within reason:).

I call this recipe “The Rajma” as it is the best recipe ever that comes close to the taste of my childhood rajma days. This is a contribution from my sister-in-law, Mathangi, who is an Army wife and who grew up in Jammu, Delhi, lived in Pathankot and who you could say is a Punjabi at heart thanks to all the traveling and living in North India. She is an exceptional cook and this is only one of her many famous recipes. So while you would think this is a cliched dish, her recipe involves some slow cooking which truly brings out all the flavors of the spices and the gravy is absolutely finger-licking. Have it with some hot rice and ghee and you will agree, this is the ultimate comfort food for those lazy Sundays.

Ingredients: (serves 4)

  • Rajma (red kidney beans) – 1 cup. I usually get the lighter red smaller kidney beans also known as Jammu Rajma, though you can make it with any variety. I feel the smaller ones cook faster and when you mash a few it blends well with the gravy, but to each his own.
  • Garlic – 3 small or 2 large pods, crushed
  • Ginger – 1 1/2 inch, grated or crushed
  • Red onion – 2 small or medium sized, chopped roughly
  • Tomatoes – 3 small or 2 large, chopped roughly
  • Cumin seeds (jeera) – 1 tsp
  • Whole coriander seeds (dhaniya) – 1 tsp
  • Turmeric powder – 1/2 tsp
  • Red chili powder – 1 tsp
  • Rajma masala – 1 tsp (available in Indian stores)
  • Salt to taste
  • Olive oil – 1 tbsp

Method:

  • Soak the rajma in about 2-3 cups of water overnight. Alternatively soak it in hot water for about 4-6 hours.
  • Boil the rajma in a pressure cooker or you can add water in a saucepan and boil over a stove till cooked. You may also use a slow cooker to cook the rajma.
  • Make a fine paste of the garlic and jeera with a little water.
  • Grind the onion and ginger separately to a fine paste.
  • Dry roast the dhaniya or coriander seeds in a flat pan without adding any oil. Now grind the roasted dhaniya with the tomatoes in a blender to a fine paste.
  • Keep the 3 pastes separately.
  • Take a heavy bottomed vessel and add about 1 tbsp of olive oil.
  • When the oil gets hot, add the garlic and cumin seed (jeera) paste. Saute for about 2 minutes till the paste becomes light brown and the raw smell goes away.

IMG_1800

  • Now add the onion and ginger paste to this mixture. Saute this mixture on a low to medium flame for about 5-10 minutes, until the raw smell of onions goes away. This step is important as the onion needs to be cooked well. The mixture will become golden brown (more than what you see in the pic below).

IMG_1801

  • Then add the tomato-dhaniya paste. Saute well once again for about 10 more minutes till the mixture blends well together and oil begins to seep out from the sides. This indicates that the onion tomato paste is well cooked.
  • Now add salt, turmeric powder, red chili powder to the mixture.

IMG_1802

  • Saute again for about 5 minutes till the spices get mixed and cooked.
  • Drain the boiled rajma and keep the rajma water aside. You will use this later instead of water for the gravy.
  • Add drained rajma to the onion-tomato-spice mixture in the vessel and mix very well till the beans get coated with the paste. Saute for another 2-3 minutes.

IMG_1804

  • Add the rajma water slowly to this mixture until you get the desired consistency for the gravy. Keep in mind that rajma thickens as it cooks so you can be a bit generous with the water, maybe 2-3 cups or as needed.

IMG_1806

  • Let this mixture come to a boil first and then keep it on a slow flame and let it slow cook for another 15 to 20 minutes. At this stage you may also transfer to a slow cooker and leave it on low for 20-30 minutes.
  • Add rajma masala, mix well and cook again for about 5 minutes.
  • Garnish with chopped cilantro and serve hot with hot rice or jeera rice and a dollop of freshly made ghee. Yum!
  • You can also use this in the Bollywood Burrito recipe:)

IMG_1812

A Lebanese feast – Foul Mudamas, Hummus, Baba Ghanouj and Mohalabiya

I have been in that rut again – weeks of travel, adventurous eating, travel bellies – in that particular order – has me battling an ominous backlog of posts and pictures. And just looking at the volume has me wondering where to begin. I’ve had this happen to me before and this is typically how the vicious cycle starts and persists.

I’ve tried a few tactics in the past to get me out of this rut – for one the food events and “We Knead to Bake” deadlines have been an inspiration, but then again, I can’t always use those as crutches – that’s not why I started blogging. The idea was to be more of an daily blog – a somewhat live commentary of my experiments with food. At times I wish I treated this more like a Tumblog, just capturing those key instant moments in time and the food visuals as and when I enjoy them. But somewhere along the way, just like everything else, I get caught up with trying to make it perfect – articulate that story behind that recipe or capture that perfect picture in the right amount of daylight, only to lose sight of the moment and muddle along, getting buried in loads of stories and pictures – somewhat like the mind and the gazillion thoughts that eventually distract me from everything.

And just like that – I feel the need to snap back into the present – time to dust off the baggage and get into more “mindful blogging”. Which does not mean that I will push aside those travelogs and recipes from the past month. It’s just that I will need to learn to start somewhere, catch up and hopefully be more “in the present” with my blogging – and living in general:)

To reminisce the origins of this recipe or this Lebanese feast, flashback to our visit to Bangkok this past May where we visited a popular Lebanese restaurant, Beirut with some friends. This was a mixed bag of sorts – I was meeting a good friend after almost 2 decades, catching up with another relatively new but very good friend and her family and meeting a new acquaintance/friend – all at this dinner:) I have to admit, I was a bit apprehensive on how we would pull this off and ensure that everyone had a good time and was comfortable. Thankfully the food was awesome to break the ice and so was the company. We hit it off like we had known each other for ages.

Thanks M and family – it felt like old times – so happy to reconnect even after all these years, thanks B and family for making it a super fun evening and lastly to our new friends – G & F, great to meet and know you and a big thank you for sharing these cherished and authentic Lebanese recipes from your kitchen.

I tried these recipes as soon as I got home for the next dinner event at our home and they turned out perfect. I had tried hummus and baba ghanouj several times before and the hummus almost always needed something, some oomph:) This was just the right texture, the perfect spice and taste. I made the foul and the mohalabiya for the first time and was quite proud of the results. For those wondering (since this was a mezze platter of sorts), I did try to make the falafels as well and they didn’t turn out just as perfect this time around, so in case you do want to try making falafels along with these dips, you could use this recipe from my previous posts.

Read more…

Lunchbox Series – Vegetarian Black Bean Burger

IMG_0268
This is another Vitamix recipe, though you can make this burger mix in any food processor as well. It’s just that I love to talk about the Vitamix’s versatility and of course put it to all sorts of tests. And it almost always wins me over. I know I’m gushing and it’s silly.  Yes, pity that the Vitamix cannot actually make the patties and sauté them as well, as a friend jokingly asked me:). Well, those are the few things it can’t do (yet) but if Vitamix is truly listening, we may just about have another innovation to make this a true all round kitchen machine.

I sent this for Nikhil’s lunch and let me just say that I now make a batch of beans and freeze them regularly (black or garbanzo or any bean variety soaked and boiled), as this is another lunch box staple and a keeper recipe.

Ingredients:

Small red onion – 1 (cut in half)

Green chili (Thai or serrano) – 1 -2 depending on spice level

Cilantro  with some stem– a small bunch

Soaked and boiled black beans – ¾-1 cup (You may also use 1 can of black beans)

Cumin powder – ¾  tsp or to taste

Garlic – 1 pod

Ginger – 1/2 – 1 inch

Garam masala (available in Indian grocery stores) – ½ tsp

1 tsp olive oil

Corn flour or rice flour – 1tbsp (you may also use 1 tbsp flax seed meal whisked in ½ cup water. The idea is to have some sort of a binding agent and flax seed meal is a good substitute for eggs)

Method:

  1. Start the blender on variable speed 1, then add the red onion, green chili, a fistful of cilantro, ginger and garlic and blend till the onions are very finely chopped.
  2. Add the boiled beans and continue to blend on variable speed 3-5. Use the tamper to mix the ingredients well.
  3. Now add a dash of cumin powder, salt and garam masala.
  4. Add the binding agent (corn flour or flax seed meal). Blend again on variable speed. The mix should resemble a coarse yet blended paste. You can keep this in the refrigerator for a while to help bind the ingredients.
  5. IMG_0266
  6. Shape into patties and cook on a skillet until brown on all sides. You may use 1 tsp olive oil to cook it till it browns well.
  7. IMG_0267
  8. Add your favorite burger condiments and the patty to wheat or multigrain sub bread. Wrap in plastic wrap or foil and pack it away for a healthy lunch:). You can see a green apple, goldfish and a cupcake in this lunch box which is yeah, still quite healthy (depends on the type of cupcake:)
  9. IMG_0264

Cooking or Coping?

The last week has been particularly stressful, to say the least. My mother-in-law had to undergo unexpected surgery which threw us all into a crazy mire of anxiety, emotions and prayer . There’s not much I can share in terms of feelings and what the family went through but it’s something I felt the need to mention given I had just talked about her recipes in my last post. She is (what a dear friend described as) a tough cookie – having had multiple surgeries and complications and many many trials in her personal life. Personally she has taught all of us a lesson with her life and her complications – to have steadfast faith in what she believes in most – expressed in her own way –  by her body and mind fighting back. While she is still on the road to complete recovery and our prayers are on, it amazes me how much there is to learn about life from her – our loved ones and elders, and how these are ironically brought to light only in such dire circumstances.

And so while my husband has tried to spend what little time with her, Nikhil and I have tried to deal with our own prayers and emotions from a distance. I, for one have been able to finally spend some time in silent sitting – something I struggled with for a long long time. Again, it’s amazing what the mind can do and how it learns to cope. This phase has certainly opened up some thoughts and feelings for Nikhil, expressed in his own way – by asking me questions, not the usual ones that always begin and end with a “why” 🙂 but some really thought provoking ones. Questions about science, evolution and a Higher Power. Questions about spending time with family and feelings. Children have an amazing way of coping.

So the last few days have been quite introspective as you can see. And what’s with the coping and cooking? Well, let’s just say I am dealing with all this and my time, of course, talking more to family and old friends, being amidst friends – mostly new friends in Singapore, cooking more than usual and just trying to stay busy. Keeps me and my mind occupied and focused and helps me work better on my silent sitting. I’m sadly not posting as much as I cook but I’m trying so bear with me.

For one, lunchbox recipes are back as Nikhil is taking his lunch every day (he is still unsure about the cafetaria in the new school, except for the famous Subway in the high school cafetaria. It’s amusing how the pre-teens love to want to “hang out” at the Subway after school – makes them feel grown up 🙂

So yesterday’s lunch box entree was Baked Falafel Masala Burgers. This is adapted from a book “Veggie Burgers Every Which Way” by Lukas Volger.

I borrowed this from the local library and I must concede that I’m looking to buy my personal copy:) Very interesting and creative recipes for vegans and vegetarians alike. Anyways, this one is adapted as I did modify the original recipe (original one is called Baked Falafel burgers, and I added the “masala” part:).

Ingredients:

1 1/2 cups cooked chick peas ( Note – I used cooked chickpeas but will recommend you use soaked chickpeas – soaked in water for about 24 hours)

Juice of 1 lemon and 1 tsp lemon zest OR 1 tsp amchur powder

1 tsp tava fry masala (MDH brand or any other)

1/2 cup chopped cilantro

Salt to taste

2 cloves garlic

1/2 media onion sliced

3-4 green chilies (depends on the level of spice you can handle)

1/2 tsp baking soda

Method:

1. Preheat oven to 400F or 190C

2. Combine all the ingredients in a blender (I used Vitamix) and blend until coarsely combined. If you don’t have a Vitamix I will recommend you use a food processor so you have control on the consistency.

3. Shape into 6 thick patties.

4. Place the patties on a liberally oiled baking sheet and bake for 15-20 minutes, flipping halfway through until golden and firm, and golden brown.

5. Garnish your burger with tzaziki or tahini dressing, onion, tomato, lettuce and the works!

Verdict – The lunch box came back clean:) Yes my critic’s comment was that the burger was too messy and crumbly, though it tasted yummy. This is why I recommend you use soaked and not cooked chickpeas as it will help bind everything better.

Chane Jaisalmer Ke (Black Chickpeas in Spiced Yoghurt gravy)

I’ve never been good at planning weekly menus or cooking by my fridge and pantry list for the week. That, like any organized planning, is an art. I’ve usually done the opposite – stocked up my pantry and fridge with the best intentions of cooking only to discover them eons later, expired and disheveled, and finally into the trash can:(

The last few months have been a whirlwind craze – home repairs, packing, moving, unpacking, cleaning – all in a span of three months and less. And this has forced me to begin to clean up my mess – literally! I’ve started to create pantry and fridge lists and also discovered a new iPhone app – Menu Planner – that allows you to create daily breakfast, lunch and dinner menus from the input, with links to suggestions and recipes:)…for an app junkie like me, this was a dream come true. Well, its week 2 of me using the app so it must be working.

In any case, one ingredient I had too much of in my freezer and pantry was “kala chana” or also known as black chickpeas or bengal gram. These are what I would call a type of Indian super food, known for their high protein content and also for lowering cholesterol in the bloodstream. I’d obviously bought a lot of this over the months, with the intention of making “chana masala” or “chana salad” etc, which, as you can tell from the recipe list, never really made the cut. But one tip that helped was to boil a few cups and freeze them in freezer bags. This way, I did use them in salads, quick curries etc.

I got this recipe from watching Sanjeev Kapoor’s “Khana Khazana”. This is also one of his recipes in his recent book “Marwari Cooking”. A quick and very healthy dish that can be enjoyed with wheat chapatis or rotis or with hot rice and some salad on the side.

Ingredients:

Black Bengal gram (kala chana) –  1 1/2 cups
Yogurt, beaten well with a fork – 1 1/2 cups
Gram flour (besan) –  4 teaspoons
Turmeric powder – 1/4 tablespoons
Salt to taste
Red chilli powder – 1 teaspoon
Coriander powder – 2 teaspoons
Garam masala powder – 1 teaspoon
Green chillies,chopped – 3-4
Pure ghee – 3 tablespoons
Asafoetida – a pinch
Cumin seeds – 1 teaspoon
Fresh coriander leaves,chopped – 2 tablespoons

Method:

1. Soak kala chana overnight in four cups of water.

2. When ready to cook, drain the liquid, add four cups of water and pressure cook till done. Make sure to reserve the water you cooked the chana in, as this has all the nutrients from the boiled chana.

3. Take the chanas in a bowl and mash them lightly.

4. Meanwhile, in a separate bowl mix yogurt, gram flour, turmeric powder, salt, red chilli powder, coriander powder, garam masala powder and whisk well so that no lumps form. Add the chopped green chillies and mix. Add one cup of the reserved liquid and mix.

5. Take a heavy bottomed pan, and heat the ghee. Add asafoetida, cumin seeds. When they begin to crackle, add the yogurt mixture and stir.

6. Add the boiled chana, and add some more of the reserved liquid. Bring it to a boil and cook for five minutes. Garnish with coriander leaves and serve hot.

Punjabi Chhole (Garbanzo Beans in Dry Curry Sauce)

DSCN0839

This is probably quite a common recipe that you’ll find in many sites, but that’s exactly the specialty of this dish too. There are so many versatile ways that Indians make this dish and each one has it’s unique distinct taste. And it goes by so many names..Chana Masala, Chole Masala, Punjabi Chole. Punjabi Chhole is the name given to this dish as made in Punjab, a Northern state in India. The uniqueness of this type of Chhole is that it is usually drier than other gravy dishes, and it also has a darker color. It has an added tang to it from the amchur or dried raw mango powder that is the main ingredient in the chana masala.

Girish surprised us one weekend evening after mom and I  returned home after a long road trip. Mom and I were both exhausted, thinking of bringing take-out, only to get home to an apron-clad father and son in the kitchen dicing onions (something that’s despised by all of us) and grinding masala (spices). It was so cute! They served Punjabi Chhole and Potato/Egg curry with steaming hot rice and chapathis.

Here’s the recipe for the Punjabi Chhole that he made:

2 cups garbanzo beans or chick peas (he used 2 cans but you can also soak beans overnight and boil the next day).

2 tomatoes (chopped)

1 can chopped tomatoes

3 medium onions (finely chopped)

2 cloves minced garlic

1 tbsp minced ginger

1/4 tsp turmeric powder

1 1/2 tspn red chili pd

1 tsp coriander pd

4 tsp vegetable oil

1/4 tsp garam masala pd

3 tsp chana masala pd

1/4 tsp cumin seeds

For garnishing – chopped cilantro, 2 onions sliced into rings, lemon wedge

Method:

1. If using fresh beans, soak them overnight, in warm water with 2 tea bags. This adds the dark color that is so typical of punjabi chole. Boil the beans in a pressure cooker with the 2 tea bags.

If using canned beans, drain the water from the can, and soak the beans in water with 2 tea bags, while you cook the remaining steps. This, again, adds the color.

2. Heat oil in a pan. Add cumin seeds when the oil gets hot. When it splutters, add the minced ginger and garlic.  Now add the chopped onions and saute until it becomes light brown.

3. Add turmeric powder, chili powder and salt to taste. Add garam masala, chana masala and fry a little more.

4. Take the chopped tomatoes and the canned diced tomatoes and puree them in a blender. Add this puree to the masalas and onion-garlic-ginger paste in the pan. Fry this mixture well, until you start to see oil leaving the sides of the paste. Add some chopped green chilies.

DSCN0835

5. Now take the soaked/boiled chole, remove the tea bags and add the beans into the pan, add very little (1/4 cup)water and stir well. Cook this for about 8-10 minutes. It helps to mash the beans (chana) a little, so the mixture binds well.  Cook till it gets a little dry.

6. Garnish with onion rings, lemon wedges and chopped cialntro. Enjoy with hot chapathis/naan/puris.

Verdict: This Punjabi chhole was finger-licking good!

Lunchbox Series – “Chipotle” Burrito

No..I don’t really have any excuses for my long silence. Call it a mix of emotions, the elation after the November election results or the shock and utter disbelief at the attrocities of the Mumbai massacre, November was an emotionally draining month. Enough to get one out of a writer’s block, but not so in my case. I have about 4 “drafts” in my blog dashboard that are begging to be finished, but unfortunately may remain drafts until something else inspires me to finish them. The good news is that while I couldn’t get myself to write, I continued to experiment with food, both the cooking and the tasting of it:) That was my way of battling the depressing news outside…my distraction.  

The one thing that I did do religiously everyday…to fuel my Roz Ka Khana (everyday food) was experiment with Nikhil’s lunch, of course, and add to the Lunchbox series that I started a while back. All in draft mode! So here is the second of the daily lunchbox musings…inspired by none other than Chipotle!

The burritos at Chipotle are a favorite in my family and beat all other Mexican fast food eateries hands down, so it was no wonder this became Nikhil’s favorite lunchbox item.

Burritos always remind me of the time when I first came to this country and started attending school in Illinois. I was just a week old on the University of Illinois campus and was just starting to explore the places to hang out or just eat a decent meal. I missed home, and my roomies were still warming up to me, so eating at home wasn’t always an option, especially since the groceries weren’t all mine anyway! I was starting to get tired of eating the “cheeseburger with no meat” at MickeyD’s…it just wasn’t the same as eating the vegetable cheese burger at Universal’s in Hyderabad! 

And so it was on a billboard on Green Street that I spotted this sign that read “Burritos as big as your head” with a guy sporting a burrito on his head like a sombrero. I’d heard from other Indian friends that the cuisine was similar to Indian cuisine…the rice and beans reminded one of rajma chawal (rice and red kidney beans curry) and the tortillas were similar to chapathis (Indian bread) but I had actually never eaten a burrito before.

And so I found myself at La Bamba restaurant to get my first taste of this “chapathi-rajma” combo. Only to realize that they weren’t joking when they said “as big as my head”. I was asked to choose my fixings and being quite ignorant, I added everything that was meatless in there. The result was this humungous burrito almost bursting at the seams from having an overdose of ingredients. One bite into it and I gagged. There were 2 kinds of beans (didn’t know I needed to choose only one), guacamole, extra cheese , sour cream, lettuce, salsa and the rice….the spanish rice I had this taste I definitely didn’t like very much.  Or it was just my gluttony attempt at stuffing more than 5 ingredients into a simple, soft tortilla and probably overstimulating my senses.

Anyway, that experience made me wary of the huge burritos and I lived on Taco Bell’s Bean and cheese burrito for the next year in school, always steering clear of the rice. When Chipotle opened in my neighborhood, I experimented with rice again only because it looked different from the spanish rice. It somehow reminded me of the Indian lemon rice and needless to say, I’ve been hooked to Chipotle since. I suppose it makes you think that the Indian-ness to the dish is probably what makes me like it so much? Probably so…and did I mention the spice?

This recipe was an attempt to mimic the Chipotle experience at home, maybe a tad Indian-ised with the tomato chutney/salsa added to it instead of the Chipotle salsa, but I think the overall flavor was not far off at all. As I said earlier, it is a staple lunch menu at my house, so is an addition to the Lunchbox series…I have also tried it with an even more Indianised tomato chutney and the taste gets even better according to me.

Chipotle style Cilantro and Lime rice

Ingredients:
1 tsp butter
2 tsp chopped cialntro
2/3 cup white basmati rice
1 cup water
1/2 teaspoon salt
Juice of 1 lime

Directions
Melt the butter in a saucepan. Add rice and lime juice, stir for 1 minute.Transfer to a rice cooker. Add water and salt and cook till done. Add in the cilantro and fluff rice with a fork.

Black beans:

Canned or washed and boiled black beans – 1 can or 1 cup beans

2 tbsp salsa

Garam Masala (optional)

1. Heat 1 tsp of olive oil in a saucepan. Add the salsa to the hot oil and the garam masala and heat till it starts to boil lightly.

2. Add the black beans, mix well and cook for about 3-5 minutes.

The Burritos:

Tortilla

1. Take a flour tortilla. Add some chopped lettuce, the lime rice, salsa, black beans, sour cream and shredded Monterey Jack cheese. Add fillings, lengthwise.

tortilla with cilantro lime rice
Layer the contents down the center of the tortilla, lengthwise. If you’re using a 12 inch large tortilla, the filling can be up to 4 inches wide and approximately 7 inches long. Leave at least 4 inches on the bottom end of the filling.

dscn0542           dscn0543     

2. First Fold.
Fold the short end of the tortilla up. This keeps the contents from spilling out from the bottom.

3. Second Fold.
Fold one of the long sides over the top of the filling. Place your fingers perpendicular across the fold, cup the tortilla over the filling and push the edge against the filling to make sure the fold is tight.

 4. Third fold.
Wrap the remaining long end over both folds.

dscn0544

I packed the burrito with some sour cream or salsa for dipping, or a mix of sour cream and salsa as a dip. Sliced peach, yoghurt and a leftover brownie cake for dessert makes for a hearty lunch, don’t you agree?

dscn0229

Post Navigation