Roz Ka Khana

A blog about everyday food. Mostly Indian. All vegetarian.

Archive for the category “Girish’s recipes”

Pachai Milagu Kuzhambu (Spicy Green Peppercorn Soup)


DSC01822

After a bout of crazy baking (yes, crazy is the right word when you are waiting for the bread dough to rise at midnight:), it was good to get Girish in the kitchen for some traditional fare.

You can tell by his previous recipes that he is kind of a “Kuzhambu King”  – Karuveppalai Kuzhambu, Vetha Kuzhambu, Kaara Kuzhambu are all his staple recipes. The names may be a tongue twister to the unorthodox ear but as any lover of Indian cuisine knows, they are distinctly different and unique to different regions of the South.

Pachai Milagu Kuzhambu is similar to the Karuveppalai Kuzhambu (curry leaves tamarind soup), but the green peppercorns give it a different kind of “burn”. That wasn’t meant to sound scary to newbies to Kuzhambu, but if you don’t know our recipes already, Kuzhambus are meant to have that tangy spice, which provide the perfect antidote to white rice and clarified butter (ghee) or the most famous combination of yoghurt rice and Kuzhambu, very lovingly known as “Thachi Mammu” in our home:)

As I have said this earlier, Singapore is a veggie and fruit haven and fresh green peppercorns, though seasonal are available (something I wouldn’t have dreamed of finding easily in the US). A trip to the local vegetable market (Tekka) and a 10 minute hunt to find a speacialty Thai store was all it took to find green peppercorns by the kilos! Of course we picked up about 300 grams which will probably last us a month or two. Green peppercorns have an extra bite to it and taste tangier than their black counterparts, which makes it a perfect accompaniment for Kuzhambu. Amma is already in the process of pickling the remaining peppercorns in brine the recipe of which I will share later.

Recipe for Pachai Milagu Kuzhambu:

Ingredients:

  • Green Peppercorns – 125 grams or about 1 1/2 cups
  • Curry leaves – 1/2 cup
  • Dry red chilies – 4-5
  • Cumin seeds – 1 tbsp
  • Tamarind, a lemon sized ball soaked in warm water
  • Salt to taste
  • Asafetida (hing) – a pinch
  • Gingelly oil – 2 tbsp

DSC_0214

Method:

1. Take a kadai or heavy bottom vessel and add half the green peppercorns, add red chilies and cumin seeds and dry roast for about 3-4 minutes. The peppercorns will begin to pop. Turn off the heat.

DSC01824

2. Now take this mixture and put it in the blender container. Add the remaining peppercorns (minus about 2 tbsp), tamarind and curry leaves to the blender container. Blend these to a smooth paste adding some water little by little so the consistency is that of a thick sauce.
DSC_0215

3. Now heat another heavy bottom vessel (or kachitti, a stoneware vessel), add about 2 tbsp of gingelly oil. Add asfetida to the oil. Heat for about 2-3 minutes till oil begins to smoke a bit.

DSC_0213

4. Now add the paste and stir to mix.

DSC_0219

Add about 1/2 cup water (to 1 cup, depending on consistency needed) and stir again. Now add the remaining 2 tbsp of fresh green peppercorns to this mixture.

5. Bring this mixture to a boil and let it simmer for 5 minutes till you get an aroma of the peppercorn curry leaves mixture.

6. Serve hot with rice and pappadums or with Thachi Mammu:).

DSC_0222

Chettinad Recipes – Kaara Kuzhambu (Spicy Tamarind Soup) and Urulai (Potato) Roast

Inspiration hits in the strangest ways. This one was good enough to get Girish to get back in the kitchen after months. The source was a bottle of the famous Grand Sweets Kaara Kuzhambu paste or pickle that we picked up last Sunday at the local Indian store in Singapore.

Those who are familiar with Grand Sweets in Chennai will swear by their sweets and savories, and I only discovered the new line of pickles and pastes on my last Chennai visit.

We were quite blown away by the authentic taste of the Kaara Kuzhambu pickle from Grand Sweets accompanied by a quip from Amma (my mother) that she had a recipe tucked away somewhere in her recipe stash. So Girish was challenged enough to try it this past Sunday and the best part was that the whole family ended up in the kitchen. Amma didn’t find her recipe but we did find this one from the Spicy Tasty blog that sounded quite authentic. Appa (my father) peeled the shallots, Nikhil peeled and chopped the potatoes for the Urulai roast (adapted from Kurry Leaves‘ blog) and Amma and I helped prep for both the recipes with the powders and spices, while Girish “directed” it all by actually cooking the dishes and added his finishing touches. So in essence it was the four of us crowded around in the kitchen to make two dishes and I have to say, we debunked the myth about too many cooks:)

The dishes turned out perfect and quite true to the Chettinad taste. Chettinad recipes have the distinct flavor of fennel, pepper and chilies in their spices and both these recipes pack that spicy punch. Note to those who don’t eat their food very spicy – you can tone down on the pepper and red chilies/chili powder, but keep in mind that the beads of sweat and the clearing of your sinuses that accompany the eating of Chettinad dishes only add to the flavor so you may be missing out on that experience:)

Recipe for Kaara Kuzhambu:

Ingredients: (for 5-6 servings)

  • Shallots – 2 cups
  • Tomatoes – 2
  • Ginger Garlic paste – 2 tbsp
  • Green chilies – 3-5 (depending on spice level)
  • Sesame oil – 4 tbsp
  • Cumin seeds –  1tsp
  • Curry leaves – a small bunch or 10 to 15 leaves
  • Red chili powder – 1 tsp
  • Garam masala – 1/2 tsp
  • Sambar powder – 2 tbsp
  • Tamarind water –  2 cups

For grinding:

  • Coriander powder – 1 tsp
  • Shredded coconut – 1/4 cup
  • Fennel seeds – 1 tsp
  • Poppy seeds – 1 tbsp (optional – I don’t get this in Singapore so didn’t use it. Turned out just as good)

Method of Preparation:

  1. Peel the shallots and cut both ends. Cut them in half if needed.
  2. Heat 2 tbsp of oil in a deep bottomed thick pan or kadai
  3. Add cumin seeds, curry leaves and shallots and fry till shallots are translucent.
  4. Add ginger garlic paste and fry for a couple of minutes followed by green chilies and chopped tomatoes.
  5. Saute till the tomatoes are well cooked and you don’t get the raw smell of tomatoes any more, or you see some oil leave the sides.
  6. Add red chili powder, sambar powder, garam masala and salt.
  7. Mix well and let it cook for 5 minutes.
  8. While it’s cooking, make a paste by grinding the coconut, fennel seeds, poppy seeds and coriander powder in a blender by adding a little water.
  9. Add the tamarind juice to the mixture in the pan and let it boil and become a thick gravy.
  10. Add the remaining 2 tbsp of oil and leave it for a minute.
  11. Now add the ground paste and  let it cook for 5 to 8 minutes at medium heat. You may need to cook a bit more or less depending on the consistency and the taste.
  12. Make sure you cook till the raw smell of sambar powder and tamarind goes away.
  13. Serve hot with steamed rice and urulai roast.

Recipe for Urulai (Potato) Roast:

Ingredients-
  • Potatoes (half boiled and diced)- 4
  • Mustard seeds – 1 tsp
  • Asafetida – 1 pinch
  • Garlic – crushed- 1/2 tsp
  • Onion chopped finely – 1 small
  • Turmeric powder – 1/4 tsp
  • Curry leaves – 1 sprig
  • Oil
To roast and grind

  • Split urad dal- 2 tsp
  • Dry red chillies-3-5
  • Whole black pepper corns-5 to 6

Method:

  • Heat a pan and dry roast the urad dal until it changes color to a light brown.
  • Now add dry red chillies and pepper corns.  Roast until urud dal turns golden brown.
  • Allow this to cool and grind to form a coarse powder.
  • Heat oil in the same pan – add mustard seeds and let it splutter. Now add asafoetida and curry leaves.
  • Add garlic, onion and turmeric powder. Saute till the onion turns golden brown .
  • Add the boiled potato and stir carefully. Add salt to taste and saute for 5 minutes.
  • Now add the spice powder and mix well.

Note – Do not stir the potatoes too frequently. You can lift the pan with the potatoes and just shake it a bit so the potatoes mix well with the spices and oil. Let it simmer on low heat for about 5-7 minutes. This will ensure an even roast.

Punjabi Samosa

Growing up in Dehradun, Punjabi Samosa used to be a treat during the monsoon and winter weekends. One person who remains in my memory is Sitap Singh, our house help, who also dished out scrumptious North Indian dishes. As my mom mostly cooked traditional South Indian, Sitap Singh’s Punjabi dishes were always a welcome change. From soft phulkas (thin wheat tortillas) with aloo gobhi (potato cauliflower dry curry) to his famous Punjabi Samosas, his dishes were delectable. Looking back, they were sadly taken for granted. As a 9 year old boy, I used to hang around Sitap Singh while he cooked and it amazes me that these are still etched in my memory.  I still remember his tips for making samosas, and the tip about rolling the dough to a thin,  transluscent disc (almost wonton like) which adds to the crispy flaky texture. We tried this for the first time ever last weekend and were quite proud of the results. Let’s just say this one was for Sitap Singh:)

Ingredients for Samosa Crust:

Olive oil – 3 tbsps
All purpose flour or maida – 1 cup
Carom seeds or ajwain – 1/2 tsp
Water – 1/4-1/2 cup as needed for dough consistency

Method for crust:

1. Mix the flour, carom seeds, salt and oil in a mixing bowl.
2. Add water little by little and knead to a stiff dough.
3. Cover with a damp paper towl and set aside for about 10 minutes

Ingredients for filling:

Potato, 1 inch cubes 4-5 medium
Green peas, boiled 1/2 cup
Olive oil 2 tbsp
Cumin seeds 1 tsp
Ginger, chopped 1 inch piece
Green chillies, chopped 3-4
Red chilli powder 1 tsp
Dry mango powder (amchur) 1 tsp
Garam masala 1 tsp
Coriander seeds 2 tsp
Fennel seeds 1 tsp
Salt to taste

Method:

1. Take the coriander seeds, fennel, cumin seeds and crush in a mortar pestle into a coarse powder

2. Boil the potatoes and roughly chop or mash them into cubes; do not over mash the potatoes into a mushy paste.
3. Add the thawed frozen or boiled peas.
4. Add the ginger, green chilies , ground coarse powder of coriander, fennel and cumin, and the garam masala, chili powder and salt to taste.

5.Add some oil to a heavy bottomed vessel and when the oil is hot, add the potatoes peas mixture.
6. Saute for a few more minutes, then add the dry mango powder or amchur. Mix well.
7. Cool before making the samosas.
8. Divide the filling into sixteen equal portions.
9. Divide the dough into eight equal portions and roll them into balls.
10. Apply a little flour and roll them into round chapathi or small tortillas.
11. Cut into half, apply water on the edges. Shape each half into a cone and stuff it with the potato and peas filling. Seal the edges well.

12. Heat sufficient oil in a kadai (wok) and deep-fry the samosas in medium hot oil till crisp and golden brown. Drain and place on an absorbent paper.
13. Serve hot with sweet date and tamarind chutney.

Contributed by Girish Ratnam

Healthy Paneer Butter Masala (Indian Cottage Cheese in Tomato-Cashew Gravy)

Panneer Butter Masala conjures up this image of a rich butter based gravy with equally rich chunks of paneer or Indian cottage cheese and heavy whipping cream as garnish. Healthy paneer butter masala does sound like an oxymoron.

I use the word healthy to describe this recipe  from Girish as it doen’t call for an ounce of butter or ghee (clarified butter). It uses cashew paste as  the base for the gravy and, yes, more importantly, does not use any whipping cream. The best part is that you don’t compromise on the taste at all. You still get a creamy, yummy paneer “butter” masala, without the butter. Girish made this over the last long weekend and it was the perfect accompaniment to hot chapathis and stuffed bitter melon (bharwan karela). This recipe is inspired from the Sanjeev Kapoor version though it has been tweaked enough to call it an original Girish version:)

Ingredients:

Cottage cheese (paneer), cut into cup – 2 cups
Oil – 3 tbsp
Cloves – 3
Cinnamon – 1 stick
Dried red chillies – 5 (if you want it to be less spicy, use fewer)
Coriander seeds, crushed – 4 tablespoons
Green cardamom seeds – 1/2 tsp
Onion , sliced – 1 medium
Fresh Ginger sliced into 1″ strips – 3-5
Garlic – 4 pods
Tomatoes, chopped – 5-6 medium
Cashews – 1 cup
Salt to taste
Kasoori methi , crushed (dried fenugreek)- 2 teaspoon

METHOD:
1. Grind the cardamom seeds, red chilies and coriander seeds to a fine dry powder.
2. Take 2 tbsp oil in a heavy bottom vessel (kadai), add cloves, cinnamon stick. When this gets heated and gives out an aroma, add garlic and ginger strips.
3. When this cooks, add sliced onions, and saute till the raw smell goes away, and it becomes light pink in color.
4. Add the chopped tomatoes and cook well till the oil separates.
5. In the meanwhile, take the cashews in a blender and blend it to fine paste with some water. If you have a powerful blender (like a Vitamix), you may not need to add water.
6. Cool the onion tomato mixture a little and transfer this mixture to the blender containing the cashew paste. Make a fine puree of the tomatoes, onions and cashews.
7. Take the remaining oil in a kadai again, add some of the kasuri methi and add the paneer pieces. Fry till the paneer is slightly golden brown, not too fried.


8. Take out the paneer and keep it separately.
9. Add the tomato taste and cook while stirring, till the paste begins to boil, and the raw taste of cashews goes away. Add the red chili, coriander, cardamom powder here, and mix well.
10. Heat for a few minutes more, add the paneer and continue to cook for 3-5 minutes.


Achaari Karela (Tangy Spicy Bitter melon)

As I typed the translation in english for Achaari Karela, I realized that this dish packed in almost all the flavors you can find in food – spicy, tangy and bitter. Flavors of life? Probably our thoughts too?

Before I begin to sound philosophical, the last few weeks have been a rollercoaster of emotions. A high as India lifted that world cup after 28 long years – the euphoria, the amazement and the exhaustion from staying up 9 long but nail biting hours to watch match after match. I think I had what I may call “cricket jet lag” for lack of a better word. But it was all so worth it. I am a little late in celebrating that victory here at RKK, but the excitement still lingers. Jai Ho!

Then it’s been some low, a lull from travels and long hours that added to that jet lag, which sort of explains my silence and possibly that philosophical streak:)

But it has been good to see Girish back in the kitchen after months. It probably stemmed from that euphoria of watching India live in Wankhede (that kept his spirits at a high and in getting back to cooking after ages. Either ways, it was a welcome break for all of us. Girish made this dish after trying it at Kiran’s in Houston. I’ve got to say that for a recipe that was derived half from hearsay (from Kiran herself:) and half observation, this was pretty darn good.

Ingredients:

Fennel seeds – 3 tsp

Cumin seeds – 1 tsp

Ginger – 2 inch cut into thin strips

Aamchur (Dried mango powder) – 2 tsp

Red chili powder – 1-2 tsp; as needed depending on spice level

Salt to taste

Bitter melon – cut into 1/2 inch pieces; seeds removed if needed

Milk – 1 cup diluted in 1/2 cup water

Aam ka achaar or Mango pickle, Punjabi style (aachar panchrangi, found in Induan stores) – 2 tbsp

Method:

1. Cut the bittermelon into 1/2 inch pieces. You  may remove the seeds if you don’t like the bitter taste of the melon. I retained some of it as it adds to the overall flavor, in my opinion.

2. Soak the pieces in a bowl of milk for upto 2 hours at least. This helps add some softness to the melons and also removes the overwhelming bitter taste.

3. Drain the milk after 2 hours, and keep the pieces aside.

4. Take some oil (about 1 tbsp) in a heavy bottomed vessel or kadhai, and after the oil is hot, add the fennel seeds. Saute for about a minute and then add the cumin seeds.

5. When you begin to get an aroma, in about another minute, add the ginger strips and saute again for a minute.

6. Now add the bittermelon pieces and mix well. Cook, covered on a medium low flame for about 10 minutes until the bittermelon is half cooked. This step takes time, as the melons may take some time to cook so you may need to keep watch amd cook a little longer if needed.

7. Now add some of the oil from the achaar, the aamchur powder and red chili powder and salt. Mix again and cook, covered for another 3-5 minutes.

8. Add the tbsp of achaar (mango pieces), mix and cook again for another 3 minutes. The bittermelon should be completely cooked by now and mixed well with the achaar.

9. Serve hot with hot rotis and/or rice and dal.

Travel Bites – Mumbai Spice, Houston

Mumbai Spice!  Houston has its share of Indian restaurants – Kiran’s (reviewed here), Udipi, Bombay Brasserie, Mughal, Nirvana, and Mumbai Spice. The two that stand out are Kiran’s and Mumbai Spice. Mumbai Spice, my home away from home as Malini calls it, has some great treats. The food tastes great and the service is fantastic. Mr Bakshi, the owner is almost always there, taking care of every little detail and making sure that the patrons walk out feeling special. He has his repertoire of jokes and shayari (Hindi or Urdu couplets) that can keep you entertained.

Now about the food. The food at Mumbai is quite the traditional Indian food that you find at most Indian restaurants. His chef Buta Singh is from Punjab and he specializes in North Indian cuisine. His specialties are Tandoori Chicken, Dal Makhani, and Paneer Do Pyaza. Last night, my colleague/friend Anil and I walked in to Mumbai Spice and asked the chef to surprise us with his favorite dishes. He brought out Paneer Do Pyaza, Bhindi Masala and Tarka Daal with some White Rice and Naan.

One of my pet peeves about Bhindi Masala at restaurants is the amount of oil they use and how much they fry it. The Bhindi Masala at Mumbai Spice was done just right – not too green and not too fried – the way mom used to make it.

Paneer Do Pyaaza was good and had the right amount of spices in it. The paneer was soft and moist with enough of the spicing to add flavoring to it.

The one let down was the dal, I prefer my dal light and not thick! This dal was extremely thick and looked like it was picked up from last evening’s buffet;)

Bottomline- Mumbai Spice is a good place to eat good Indian food, though not as sophisticated as Kiran’s. But the quality of the food and the host make it a must try place in the Houston suburbs.

PS: If you do make the trip ask for the Mirchi Pakoras if you like really spicy Indian style Pepper tempuras.

Punjabi Chhole (Garbanzo Beans in Dry Curry Sauce)

DSCN0839

This is probably quite a common recipe that you’ll find in many sites, but that’s exactly the specialty of this dish too. There are so many versatile ways that Indians make this dish and each one has it’s unique distinct taste. And it goes by so many names..Chana Masala, Chole Masala, Punjabi Chole. Punjabi Chhole is the name given to this dish as made in Punjab, a Northern state in India. The uniqueness of this type of Chhole is that it is usually drier than other gravy dishes, and it also has a darker color. It has an added tang to it from the amchur or dried raw mango powder that is the main ingredient in the chana masala.

Girish surprised us one weekend evening after mom and I  returned home after a long road trip. Mom and I were both exhausted, thinking of bringing take-out, only to get home to an apron-clad father and son in the kitchen dicing onions (something that’s despised by all of us) and grinding masala (spices). It was so cute! They served Punjabi Chhole and Potato/Egg curry with steaming hot rice and chapathis.

Here’s the recipe for the Punjabi Chhole that he made:

2 cups garbanzo beans or chick peas (he used 2 cans but you can also soak beans overnight and boil the next day).

2 tomatoes (chopped)

1 can chopped tomatoes

3 medium onions (finely chopped)

2 cloves minced garlic

1 tbsp minced ginger

1/4 tsp turmeric powder

1 1/2 tspn red chili pd

1 tsp coriander pd

4 tsp vegetable oil

1/4 tsp garam masala pd

3 tsp chana masala pd

1/4 tsp cumin seeds

For garnishing – chopped cilantro, 2 onions sliced into rings, lemon wedge

Method:

1. If using fresh beans, soak them overnight, in warm water with 2 tea bags. This adds the dark color that is so typical of punjabi chole. Boil the beans in a pressure cooker with the 2 tea bags.

If using canned beans, drain the water from the can, and soak the beans in water with 2 tea bags, while you cook the remaining steps. This, again, adds the color.

2. Heat oil in a pan. Add cumin seeds when the oil gets hot. When it splutters, add the minced ginger and garlic.  Now add the chopped onions and saute until it becomes light brown.

3. Add turmeric powder, chili powder and salt to taste. Add garam masala, chana masala and fry a little more.

4. Take the chopped tomatoes and the canned diced tomatoes and puree them in a blender. Add this puree to the masalas and onion-garlic-ginger paste in the pan. Fry this mixture well, until you start to see oil leaving the sides of the paste. Add some chopped green chilies.

DSCN0835

5. Now take the soaked/boiled chole, remove the tea bags and add the beans into the pan, add very little (1/4 cup)water and stir well. Cook this for about 8-10 minutes. It helps to mash the beans (chana) a little, so the mixture binds well.  Cook till it gets a little dry.

6. Garnish with onion rings, lemon wedges and chopped cialntro. Enjoy with hot chapathis/naan/puris.

Verdict: This Punjabi chhole was finger-licking good!

Vatral Kuzhambu (Tamarind Stew/Soup with sundried vegetables)

This one is a toughie to translate into plain English. Once again, an authentic Tamil dish, Kuzhambu, which means a kind of stew or soup, and Vatral which refers to sun-dried vegetables, is a comfort food in my home.

But before I write about this recipe, let me back up. I almost forgot , but today marks the 1 year anniversary of Roz ka Khana! I am actually a little embarrassed to say that I almost forgot that it was our birthday. I mean, yes it was February last when I penned the Paruppu Rasam recipe, but I had to go back into the archives to look up the actual date. And maybe I am a little overwhelmed too thanks to my dear friends and readers who reminded me to go look up that date! Sheela, thank you for being such a sweetie and shaking me out of my doldrums with your cheery note.  Thanks for being such an ardent follower among everything else.

And I should also thank Anu of AnEmily’s Vegan Adventures for requesting this recipe. Anu, this was the perfect recipe for RKK’s one year anniversary. I don’t think I’m really a Tamil purist when it comes to recipes, but Tomato Paruppu Rasam (lentil and tomato soup) and Vatral Kuzhambu are the staple, comfort foods in my home, so what better way to pay my tribute to RKK than to post another favorite comfort food? While the Rasam is my staple recipe, this one is Girish’s. As I wrote earlier in the 2 month anniversary of this blog with Girish’s Curry leaves Soup (Karuvepillai Kuzhambu) recipe , he is the inspiration behind this blog. So here’s to Girish again for your love and support, and to all of you family and friends who have been contributing and following this food chatter so far….thank you.

Vatral Kuzhambu recipe (Tamarind Soup)

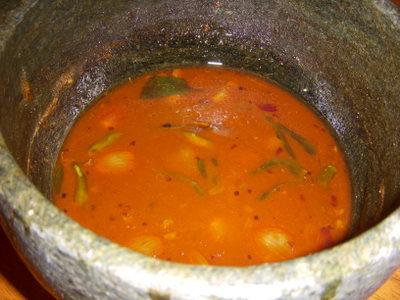
This is also called Pulusu in Andhra/Telugu lingo. As I mentioned in the Curry Leaves soup recipe, this tastes best in a kachitti or a stone vessel, especially when it’s a day old. If you don’t have this vessel, it can also be made in a regular pot or pan, but make sure to save some for the next day so it has had all the time to let the flavors of the sesame oil, the fenugreek and the vegetables sink in. Also, this recipe is not really true to its name as we did not add the sun-dried vegetables or vatral. The sun-dried vegetables are available as is in Indian stores. We did not add it here since the onions have such a strong flavor that you can make this soup without the vatral. The real reason also was that we didn’t have enough vatral handy:). You can also call this recipe Vengaya Vatral Kuzhambu (Tamarind Soup with baby Onions)

Ingredients:

(I don’t have too many pictures to post for this one. I inadvertently erased some of the colorful ingredient pictures that I took  as I was transferring the pictures to my computer. As soon as I’m done poring through the 2500 photos on my hard drive in a desperate attempt to find them, I will try to update this post with better pictures.)

A large lemon sized ball of tamarind (enough to make about 2 cups of tamarind juice)

1/2 cup pink baby onions or shallots

2 tbsp fenugreek seeds

2 tbsp sesame oil

2 tsp vatral kuzhambu podi (I get this from India, but you can also use Sambar powder that is available in Indian grocery stores – MTR Madras Sambar powder). Alternatively you can find the recipe here.

2 sprigs of curry leaves

6-7 green chilies (the Thai variety)

a pinch asafetida ( we use a brand called SSP that we have only found in India but you can use any brand. SSP is in the granule form instead of powder and we use about 3-4 granules for a good strong aroma )

1. Heat the sesame oil in the kachitti or the stone vessel.

2. When it starts to smoke a little, add the fenugreek seeds, lower the flame and let the seeds get dark brown and oil starts to smoke again.

3. Add the asafetida. Add the kozhambu powder (podi).

4. Add the shallots, curry leaves, green chilies and the sun-dried vegetables (vatral) if available here. Fry till medium brown.

5. Add the tamarind juice and salt.

6. Let the mixture boil on a low flame for 10-15 minutes until the soup starts to thicken a little. You can also add a small amount (half a tsp)of jaggery (crystallized brown sugar) here for an added taste. If the soup is too watery, you can add a little rice flour and water made into a paste to thicken it. But if you let it boil enough, you may not need this step at all.

7. Serve with hot white or brown rice and ghee (clarified butter) with a side of paruppu (boiled and mashed lentils).

dscn0750

Post Navigation