Roz Ka Khana

A blog about everyday food. Mostly Indian. All vegetarian.

Lunchbox Series – Mung “Kachumber” Salad  

Tried this protein packed recipe for our lunchbox today. I call this a kachumber as it has the onion tomatoes and cucumber though I did lightly stir fry this to bring all the ingredients together. You may just make this as a raw salad as well, leave the oil and seasoning out. 

I packed his as an accompaniment to a mixed salad that had all the colors of the rainbow along with a creamy mustard dressing. (Recipe below)

  
Mung Kachumber:

Ingredients :

  • 100 grms or 1 bowl Moong sprouts
  • 1/2 onion finely chopped 
  • 1 carrot, 1/4 cabbage, 1 capsicum finely chopped or shredded
  • 1 cucumber finely chopped
  • 2 green chillies crushed
  • Bunch cilantro finely chopped
  • 1tsp mustard seeds 
  • 1/4 tsp asafetida or hing
  • Salt to taste or jiralu powder
  • 1/2 tsp kitchen king masala or garam masala

Method:

  1. Take a pan or a kadhai, Add 1 tsp olive oil. 
  2. When it’s hot add mustard seeds and let it sizzle and pop
  3. Now add the asafetida. 
  4. Add the chopped onion and lightly sauté till transparent. 
  5. Add the cabbage and bell pepper and let half cook i.e it should still be crunchy. Add cucumber and carrot. Sauté for about a minute more. 
  6. Add the crushed green chilies and salt to taste. 
  7. Switch off the heat and stir everything till well mixed. 
  8. Garnish with chopped cilantro. This can also be eaten with hot rotis or by itself as a mid afternoon or morning snack. 

And here’s the salad that went with it in the lunchbox.  


Recipe for creamy mustard dressing:

  • 3 tablespoons red wine vinegar
  • 1/2 teaspoon Dijon mustard
  • 1/2 teaspoon (about 1 large clove or 2 small cloves) minced fresh garlic
  • 1 tablespoon mayonnaise
  • 1/4 tsp sea salt
  • 1 tsp honey 
  • 1/4 teaspoon freshly ground black pepper
  • 1/2 cup extra-virgin olive oil

Whisk all the above in a small bowl with a fork or a small whisk. You can store this for about 3-5 days in the fridge. 

Roz Ka Khana has moved!

Roz Ka Khana has moved to a new site (www.themindfulveggie.com) with a new look and name (more details on why soon)! Please be patient as the site migrates and we try to fix all the kinks. Email subscribers and WordPress followers on http://www.rozkakhana.com will be automatically transferred to the new site. WordPress followers should also go to the new site and click on “subscribe” to continue getting updates. Apologies for the temporary inconvenience caused but hope to sail through the remaining migration aspects very soon and have a brand new site with more recipes and features.

Lunchbox Series – Buckwheat Soba Noodles with Tofu in Spicy Miso Sauce and Mung sprouts salad

Trying to get back in the swing of things after days of eventful and exciting travel, bouts of illnesses and days of being in a rut. If I can be a tad introspective for a change, something about life has always intrigued me – do things always happen as ups and downs in sequence as in moments of happiness or “up” moments followed by “down” times? Or is it all merely what we perceive as an up or a down moment? Are we just conditioned to expect happy times to be automatically followed by stress and down times?

Over the past month it feels like we have experienced just that – fun and travel to exotic destinations, days of adventure and excitement that were quickly followed by bouts of illnesses in the family and of course the vagaries of work and home and life’s decisions that seem to be looming large with no respite in sight.

I have come to the realization that it all boils down to how you react to situations and what you really label as an “up” or “down” moment in life. It’s all relative.

When I really put things in perspective, illnesses are the body’s way of telling you to slow down when you’ve had a “bit too much fun” or have exerted the body to beyond what it can endure. Is that really a down moment or an opportunity to applaud and cherish the body for letting off steam and resetting itself?

And all the uncertainties that seem to befall us? They are just life’s way of telling us that at times it’s okay to just “let it be”. It’s not always that things will go “as planned” and when they don’t, it’s time to just step back and watch the drama unfold. Be tossed around a bit but hang on like you were hanging on to that raft when you were rafting amidst the whitewater rapids in Australia (that we just experienced a few weeks ago and despite all the uncertainty that came with the experience we definitely labeled it as all fun – an up moment at the end of it all:). Take care not to fall off (and even if you do, jump right back on) and after all the jostling and tossing you will almost always get back to floating on the calm of the river. Now you could call any of this an “up” moment or a “down” moment – it’s all relative at the end of the day.

So there you have it. That’s the frame of mind I am in and it actually feels good to jot that down and put things in perspective for a change. It’s almost cathartic.

Getting back to what I really started to write about which was to clear my backlog of the lunchbox series, here’s another recipe from that protein lunch week that I wrote about a while back. Soba Noodles with marinated tofu, bean sprouts, cilantro. Packed with some mung sprouts salad, cut fruit and you have yourself a nutritious lunchbox that you can look forward to in the day.

Ingredients
  • 1 medium red bell pepper, thinly sliced
  • 1 carrot thinly sliced
  • 1 (8 oz.) package of buckwheat soba noodles
  • 1 cup bean sprouts
  • 10 oz extra firm tofu, cubed and sliced.

Spicy Miso Sauce

  • 2 cloves garlic
  • 1 teaspoon grated fresh ginger
  • juice of 2 limes
  • 3 Tablespoons unseasoned rice vinegar
  • 1½ Tablespoons maple syrup
  • 1 Tablespoon white miso
  • 1 Tablespoon peanut butter
  • 1 Tablespoon sesame oil
  • ½-1 Tablespoon chili sauce or Sriracha
  • 2 teaspoons bragg’s liquid aminos (or low sodium soy sauce)
  • ¼ cup water, to thin

Note: If you don’t have miso you may just use soy sauce or tamari but the flavor will be different. You can also add dulse flakes or crushed seaweed for that “umami” flavor.

Instructions
  1. Prep the bell pepper and carrots by washing and chopping it.
  2. Combine all ingredients for the sauce in a blender, blend and then set aside. Add the cubed tofu to this mixture and set aside for about 15-20 minutes to marinate.
  3. Cook the soba noodles according to package directions in a large pot. When done, place noodles in a colander and rinse with warm water, drain and place back into the pot.
  4. Heat a large nonstick skillet over medium-high heat. Add ½ tablespoon coconut oil to pan. When hot, add red pepper and carrots to pan; sauté 6-10 minutes or until half cooked.
  5. Once the veggies are cooked to your liking, pour sauce over the mixture. Mix well to make sure the sauce gets distributed evenly. Add the noodles and stir well to evenly coat the noodles and veggies with the sauce. Add the bean sprouts and tofu. Cook for another 2-3 minutes, mix and switch off the heat.
  6. Garnish with cilantro, basil leaves (optional), and sliced lemon wedges.

Moong Sprouts salad:

Ingredients:

  • Sprouted whole green gram or mung –  1 cup
  • 1/2 cucumber, finely chopped
  • 1/2 onion finely chopped
  • 1/2 raw mango, chopped fine (optional)
  • Black salt or chaat masala, to taste
  • 1 tbsp lemon juice

Mix all the above ingredients and chill before serving.

Black-Eyed Beans (Lobhia) with Tomatoes

IMG_1673

This recipe has universal appeal because it blends techniques and tastes that are popular across cuisines. The dish pairs as well with a crusty batard or flat bread as with steamed rice and because it uses so few ingredients, is a breeze to put together.

The only mildly challenging part is cooking the dried black-eyed beans, or lobhia as they are called in Hindi. You’ll have to soak the beans in water first and allow for some generous cooking time. Of course, you could always use canned black-eyed beans, in which case this will be ready in a jiffy.

The dish improves with keeping so it’s a perfect make-ahead if you’re planning to entertain.

You could serve it on its own with tortillas and french bread or you could add some cheese and pop it under a hot grill before bringing it to the table. Alternately, top the dish with some roasted bell peppers or lightly sautéed strips of capsicum.

Ingredients:

Serves 2-3

  • 1 cup dried black eyed beans or two 410g (14 oz) cans of cooked beans
  • Onion – 2 medium, finely chopped
  • Tomato – 4 medium, skinned and finely chopped, or a can of peeled tomatoes, drained and chopped
  • Garlic – 4-5 cloves, finely minced
  • Cumin seeds – 1 tsp
  • Chilli powder or minced fresh green chillies (optional, to taste)
  • Garam masala – ½ tsp (optional)
  • Olive oil
  • Salt as needed
  • Butter (optional)

Method:

  • Soak the beans in water for about four hours.
  • Rinse, cover with plenty of water, and bring to a boil. Lower the flame and let the beans cook, stirring occasionally and adding more water so that there is always an inch of liquid above the beans. This could take about an hour and a half or slightly longer. Alternately, if you have a pressure cooker, cook the beans for about 10 minutes under pressure. Do not discard any excess water. If you are using canned beans, rinse thoroughly under running water and drain.
  • Mash a few cooked beans to thicken the gravy.
  • Heat the olive oil in a wok or pan and when hot add the cumin seeds and let them sizzle for a second or two.
  • Add the finely minced garlic cloves and fry for a few seconds.
  • Add the onion and fry on medium heat for about five minutes until they start to change color.
  • Add the fresh or canned chopped tomatoes and fry until the moisture evaporates and the mixture is homogenous.
  • Add the chilli powder and garam masala, if using, and fry for a few seconds.
  • Add the cooked beans, salt and some water if necessary, cook for about 10-15 minutes until the mixture thickens.
  • Add pats of butter and serve.

IMG_1675

Lunchbox Series – Day Two – Mediterranean Salad with Creamy Garlic Cilantro Parsley Dressing

IMG_1520

It’s been quite a busy few days so pardon the delays in the “daily posts”. For one I have restarted the 1-green-smoothie-a- day series again. This time for 21 days. I figured it’s February and probably a month where the zeal of New Year resolutions just starts to wane so why not try to keep the momentum alive. I have been smoothie-ing for the past year and a half and cannot tell you how beneficial it has been for me. There have been quite some requests to share the daily recipes so I just started to post them here and on the Facebook page, in case you’re interested in following along.

So get your green smoothie to start your day and continue to nourish with these protein packed lunches.

Day Two comprised of a Mediterranean Salad inspired from this popular salad chain in Singapore called Salad Stop. The perfect combination of carbs, protein, greens and veggies topped with a creamy Arabic spiced vinaigrette. Top this with a peanut chaat and some fruit and you have a wholesome lunchbox to last you through the 4pm sugar or caffeine rush.

Ingredients:

  • Romaine lettuce, torn into bite sized pieces – 2 cups
  • Red bell pepper, sliced thin, 1/2 cup
  • Chickpeas, 1/2 cup, boiled and drained
  • Boiled potato, 1 , cubed
  • Cucumber, 1/2 sliced thin
  • Cherry tomatoes, 1/2 cup, halved
  • Falafels – 4-5. (Prepared ahead using this recipe. You may also use an organic falafel mix).

Layer all the above in that order in the lunchbox container.

Arabic Spiced Vinaigrette:

  • ¼ cups Olive Oil
  • ¼ cups Fresh Squeezed Lemon Juice
  • 2 teaspoons Apple Cider Vinegar (can Substitute White Vinegar)
  • 2 teaspoons Dried Mint
  • 2 cloves Garlic, Minced
  • 1-½ teaspoon Sugar
  • ¾ teaspoons Salt
  • ¼ teaspoons Fresh Ground Black Pepper
  • •¼ cups Loosely Packed Fresh Parsley
  • 1/4 Chopped cilantro

Blend all the above to a creamy mix.

Peanut Chaat:

  • 2 cups boiled peanuts
  • 1 large red onion, finely chopped
  • 2 green chilies chopped fine
  • cilantro, 1/2 cup chopped
  • juice of half to one lemon squeezed.
  • salt to taste

Mix all the above and garnish with cilantro.

Lunchbox Series – A Week of Protein Packed Lunches – Day One – Rainbow Salad with Lemon Vinaigrette

I just realized that this is my first post for the new year. A wee bit late but what better way to start than with some healthy lunchbox recipes. It’s always heartening to see the whole family get on a healthy streak versus a lone crusader (that would be me) experimenting with single serve “healthy” menus which has been the case for some time now. I’d still try to cook and pack healthy food for Nikhil but I have never wanted to force “dairy free” or “gluten free” or “grain free” menus on anyone, even on myself. Those have purely been weekly experiments to see the effect of elimination of some of these highly talked about diets, on my own body. And I have realized that some things that work for me may not work for everyone. To each his own. I have, for example, tried to eliminate milk, caffeine, white flour, white rice, white sugar etc. from my diet, I try to be gluten free once a month if I can, have introduced fermented foods like kefir and kombucha on a regular basis and have noticed quite drastic effects on my energy levels, skin, vision and even my outlook in general. I keep trying something new every month and it’s amazing to see the direct effects of food on the body and mind.

But I’m also not wont to spending hours catering to every diet need at home so this project meant that either everyone get on the healthy bandwagon or I jump off and “be normal”:) Save my green smoothies of course, which I have stuck on to – possibly for life:)

So it came as a pleasant surprise when last week G announced that he wanted to try packing lunches to work. And make it a rice-free but protein laden week. Like I said I have enjoyed packing lunches for Nikhil, something I would never have imagined I had in me, but I also love a good challenge. One of my favorite pastimes on weekends (call me strange) is creating healthy menus for the week ahead and it has been a blessing to have a planned food calendar for everyone in the house – removes the stress out of crazed weekday mornings, eradicates the eternal and annoying “what’s for lunch or dinner” questions and makes shopping easier.

And so we were on. Vegetarian, protein laden menus for the week, minus rice, pasta and heavy carbs. Here’s what it looked like:

Screen Shot 2015-01-30 at 9.03.33 PM

I have been posting the daily lunchboxes on the Facebook and Twitter pages but do need to record the recipes somewhere for posterity and of course to share with those interested. So here goes…a daily recap of the #proteinweek #lunchbox.

Day One:

IMG_1511-0

Rainbow Salad with Boiled Egg and Lemon Vinaigrette:

Ingredients: (for one lunchbox)

  • Romaine Lettuce – 2 cups
  • Grapes – 1 cup, sliced
  • Red apples – 1 cup, chopped
  • Red Bell pepper- 1/2 cup sliced thin
  • Carrot – 1/2, grated
  • Red cabbage- 1/4 grated
  • Sunflower seeds – 1/4 cup
  • Boiled egg – 1, sliced (you may replace with tofu or tempeh or quinoa if you don’t eat eggs for other protein alternatives; even paneer or haloumi cheese if you don’t mind dairy)
  • Kidney beans, 1/2 cup, boiled

Lemon Vinaigrette: (Epicurious.com recipe)

  • 1/2 teaspoon finely grated lemon zest
  • 2 tablespoons freshly squeezed lemon juice
  • 1 teaspoon sugar
  • 1/2 teaspoon Dijon mustard
  • 1/4 teaspoon fine sea salt, or to taste
  • 3 to 4 tablespoons extra-virgin olive oil
  • Freshly ground black pepper to taste

Method:

In a small bowl, whisk together the lemon zest, lemon juice, sugar, mustard, and fine sea salt, until the sugar and salt are dissolved. Add the oil , whisking constantly until the dressing is well blended. Season with fine sea salt and freshly ground black pepper. The vinaigrette can be prepared ahead and refrigerated, in an airtight container, up to 3 days.

Chickpea or Kabuli Chana Chaat:

  • 1 cup chickpeas, soaked overnight, boiled and drained
  • 1 small onion, chopped fine
  • 1 cherry tomato, chopped fine
  • 1 tsp Jiralu powder or chaat masala (available at Indian stores)
  • Salt to taste
  • Juice of half a lemon
  • a small bunch of cilantro, chopped.

Take the chickpeas in a bowl and mix the first 5 ingredients. Add the lemon juice and garnish with chopped cilantro.

Thai Vegetarian – Steamed tofu in garlicky lemon sauce (Tao Huu Neung Manao)

This is one of those unforgettable dishes that stays etched in your memory months, no, years after you savor it for the first time. It was a serendipitous visit to a restaurant called Sabai Thai at a bustling Orchard Road mall, during one of our first visits to Singapore (before we officially moved here).Unbeknownst to us we had hit a gold mine in a Thai restaurant that had a unique all vegetarian menu😊.

This steamed tofu dish in a garlic and lemon sauce was one of the best dishes on the menu and the most unique Thai dishes I have tasted – different from the usual curry, salads and other fares that dot most Thai vegetarian menus.

I tasted this dish again exactly 3 years later at Sabai’s other branch near the Fullerton Bay Hotel. The flavors were still the same and I realized they were probably one of the few restaurants to offer a vegetarian version of this dish. Typically made with steamed whole fish in garlic and lemon sauce or Pla Kapong as it is called, this is considered popular in Isan cuisine, the northeastern part of Thailand.

There was something about this dish that, like many other Thai dishes had an Indian taste, South indian, to be exact.. It was like a fusion of tofu simmered in a rasam broth. Possibly why my rasam loving husband listed it as his most favorite-est Thai dish:)

And as you know from this post, I am always looking to re-invent the rasam. Lime Rasam Noodles and now Tofu with Garlic Lime Rasam?

So I tried to recreate this recipe and looked around for the best recipe for guidance. Surprisingly there were no vegetarian versions out there and even the original fish recipe was not documented very clearly. So this was one of those experiments where I made the sauce from half memory and half inspiration and was quite proud of the result.

This one is for the files and will be used again. Dinner that evening was Thai vegetarian green curry, steamed white rice and Tao Huu Neung Manao.

Nom Nom.

IMG_1183

Ingredients:

Fresh tofu (medium firm) – 1 packet

Garlic 3-4 pods or 3 tbsp

Lemon –  1 1/2 squeezed; or 3 tbsp

Thai red chili, sliced – 4 (note the red ones are very very spicy so you may substitute for 2-3 green ones)

vegetable stock – 1/2cup

Miso paste – 1 tbsp or to taste (this is used in place of the fish sauce)

1/2 tsp sugar

Cilantro, 1 bunch

Thai basil leaves, few chopped, optional

salt, to taste

Method:

  • Slice the tofu into 1/2 inch thick rounds. Set aside.
  • Now make the sauce. Mix the vegetable stock, crushed garlic, red chilies, cilantro, miso and sugar together. Add salt to taste.
  • Take a flat vessel with edges. Pour some of the sauce/liquid in the vessel. Place the tofu slices. Add more of the sauce over it so the tofu is able to soak up the liquid.

IMG_1182

  • Use a steamer or pressure cooker. Pour some water at the bottom of the pressure cooker, keep a small cup upside down and place the flat vessel with the tofu and sauce over it. If you have other sophisticated steamer vessels please use your own method but this was my contraption to ensure the tofu and liquid get steamed together:)
  • Pressure cook for about one whistle or for about 7 minutes. Make sure you don’t steam for too long as it will dismember the tofu.
  • Wait for the pressure cooker to cool and then open the lid for a wafting garlicky aroma:). Garnish with chopped Thai basil leaves,
  • Enjoy with steamed hot white or brown rice.

IMG_1189

Snappy Salads – Lemony Kale Salad

This catchy title from MindBodyGreen caught my eye recently. “A Salad That Makes Even The Skeptics Fall In Love With Kale”:). So there it was. My next salad inspiration. I took this for lunch last week and am not being cliched when I say “I licked this salad clean.” Yes. This is the best kale salad I have tried. And in making it I also discovered how the natural flavors of kale can be accentuated.

The secret to making the perfect kale salad is this – Massage that kale. Use your bare hands. I think what makes kale salads so gratifying is that you literally use your senses to make it. No tongs, no fancy equipment, just roll those sleeves and use your fingers to press the kale leaves and rub them together. With or without the dressing.The process of massaging apparently breaks down the cellulose in the kale leaves and makes them soft and pliable, so when you douse them with dressing and any other flavors they take to them easily. I already have a kale “fetish” thanks to the oodles of green smoothies I have been consuming but this just took my kale love to new heights.

Note: The pictures don’t do enough justice to how delectable this salad is, and the fact that I didn’t slice the onions didn’t help to make it look as appetizing as well but this is one time I will guarantee it is worth the try. You will begin to LOVE kale:). Oh and did I mention this goes very well with Indian dishes too.

Enough gushing I suppose, here’s the recipe.

Serves 2 to 3 people
Prep Time: 20 minutes

Ingredients

  • 2 bunches Lacinato kale (also called “Tuscan” or “Dinosaur” kale)
  • 1-2 lemons, squeezed
  • 3-6 cloves of garlic, crushed
  • Half cup of pumpkin seeds
  • 1 large white onion, sliced thin. I used red onion and chopped it fine and it was equally good so depends on how strong you like your onion flavors.
  • Olive Oil, to taste
  • Balsamic vinegar, to taste
  • 1/2 tsp sea salt
  • 1/2 tsp pepper

Method:

  • Thinly slice the onion.
  • Take the crushed garlic into a bowl, and combine with salt and pepper. Set aside.
  • Add the sliced onions to the mix, douse with a healthy amount of olive oil and balsamic, mix well and set aside to marinate.

IMG_0902.JPG

  • Take the kale and strip the leaves off the stem. (You can check this video from Marin Mama Cooks on how to prep the kale). Break the leaves into bite sized pieces into a salad bowl.

IMG_0900.JPG

  • Squeeze one lemon directly onto the kale. Now begin to massage the kale, rubbing them together or using whatever technique you like, but ensure that the leaves get coated well. The kale will reduce in size and become smooth. You may taste the leaves here. If you still find them to be bitter, then add more lemon and keep massaging till the taste gets all lemony.

IMG_0899.JPG

  • Now heat a skillet and add the pumpkin seeds. You may add some coconut oil to the skillet to roast the seeds or just roast them dry. Once the seeds turn golden, remove the pan from the heat and let cool.

IMG_0903.JPG

  • Now add the marinated onions into the kale bowl, and throw in the cooled pumpkin seeds. You can massage the leaves again to ensure the leaves are coated well with the dressing. You may also add more salt, pepper, oil, or lemon until you find that perfect flavor.

IMG_0901.JPG

I had saved some leftovers at home but the salad was gone before I could try it again for dinner. The original recipe says that this salad only gets batter with age so keeping it in the refrigerator and eating the next day will enhance the flavors of the citrus and kale even more.Sadly we didn’t have any left to try this but that’s a good problem to have I suppose:).

Snappy Salads – Cucumber, Tomato and Feta, a Watercress Slaw , Home Made Dressings and more

After a week of binge desserts, festival food and family gatherings for Diwali post a whirlwind trip to India, I needed to quickly get back on the real food wagon. Oodles of sweets and savories, jaggery laden manoharams, murrukkus, gulab jamuns– top these with food coma induced naps countered with jet lag and a crazy road trip, and I was back to needing another vacation.

It’s amazing how your body begins to tell you (more like when you listen to it:) when you fall off the wagon and what it needs to get back on track. For the 10 days that I was filling my body with whatever was in front of me, it showed in my energy levels and my skin. I returned with breakouts, allergies, sinus headaches and all that I thought I had left behind months ago. Not that I wasn’t eating sweets and such in general – I‘m a big believer of eating everything in moderation, but a healthy balance of exercise and greens was doing the trick so far for me. It has now taken a full 10 days to get my schedule and energy back with my favorite green smoothies, juices, and greens.

So I figured I would get started with updating my salad repository or rather actually trying the many salad recipes I have stored in my Evernote files. I’ve been an avid user of Evernote of late, on my desktop and phone. I find it extremely useful when I’m browsing through my various news feeds and find anything that catches my eye, and this could be a list of books, articles, quotes, anything that tickles my funny bone and my palate. The best part – I can sync my notes with my tablet and phone and access my notes anywhere. So I have collected over 450 notes so far, more than half of which are recipes of course. I find this very handy when I’m planning my weekly lunch and dinner menus to pick from the various folders that I have saved recipes into- it’s a virtual cookbook that I can access from anywhere 🙂

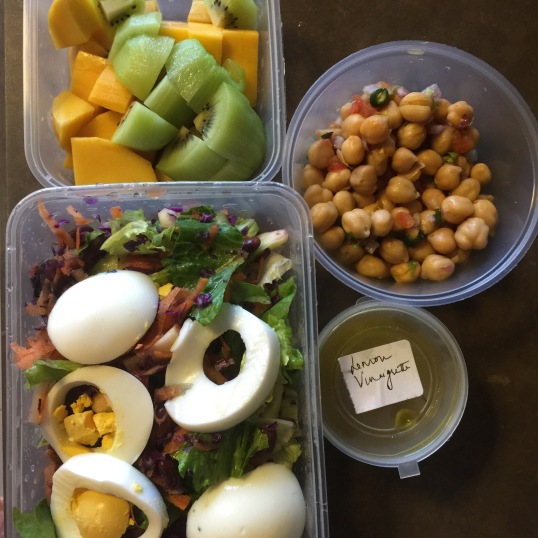
This week, we had watercress and carrot slaw with home-made orange vinaigrette, and vegetable soup (with sandwich for those who wanted some extra heavy carbs) for dinner on Monday night. Today I toted along a cucumber tomato feta salad for lunch. You can use the second salad as an accompaniment to an Indian meal if you leave out the feta.

I used a useful gadget called the Salad Zinger to make the orange vinaigrette and it was amazing. Recommend the buy if you’re a gadget freak like me;) though you can still make it in your good old blender.

IMG_0795.JPG

Here are the recipes.

Watercress, green apple and carrot salad/slaw (Serves 2)

  • Watercress – a big bunch, chopped
  • Red cabbage – 1 /4 , grated
  • Carrots – 2, grated
  • Cherry tomatoes – 6-7, halved
  • Green apple – 1, grated

Orange vinaigrette dressing:

  • Navel oranges – 1, deseeded and quartered
  • Red onion, a small slice
  • Parsley, a small bunch about 1/8 cup
  • Garlic pod – 1
  • Olive oil – ¼ cup
  • Red wine vinegar – 2 tbsp
  • Honey – 1 tbsp

For making the vinaigrette in the Salad Zinger, you will need to fill the first 4 dry ingredients in the bottom half of the gadget and screw the blades and bottom back on. Fill the top part with the liquid ingredients, shake the contraption and let the juices from the orange, onion mixture seep into the olive vinegar mixture. Let it sit for at least a half hour before adding to the slaw.

IMG_0794.JPG

Alternatively you can coarsely chop the first 4 ingredients in a blender, add it to a bottle and fill the bottle with the wet ingredients. Let steep for a half hour before serving.

Take the grated veggies in a bowl. Add the dressing and toss to combine.

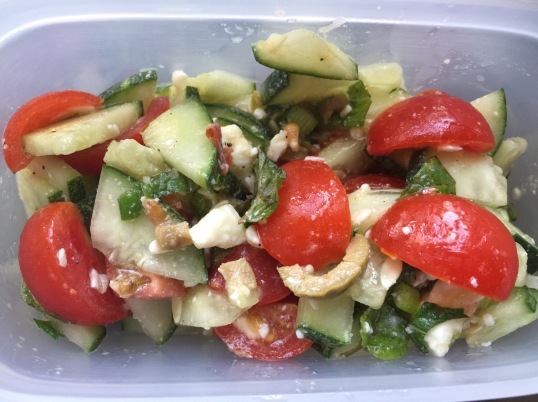
Cucumber, tomato and feta salad

Ingredients:

  • 3 cups of cucumber, coarsely chopped
  • 7-8 cherry tomatoes, halved
  • Mint leaves, 2-3 tbsp, chopped
  • Scallions, 2, chopped with the leaves
  • Green olives, ¼ cup
  • ¼ cup feta cheese, crumbled

Dressing:

  • Lemon juice, 1 tbsp
  • Olive oil, 2 tbsp
  • Salt and pepper to taste

Method:

Mix the cucumbers, tomatoes, scallions, mint in a large bowl. In a separate bowl, whisk together the lemon juice and olive oil and season with salt and pepper. Go easy on the salt as feta is salty by itself. Pour the dressing over the salad, toss and sprinkle the crumbled feta before you serve.

IMG_0818.JPG

Eating in the Raw — Rasam week – Pachi Pulusu (Raw Spiced Tamarind broth)

IMG_0479.JPG

In keeping with Rasam week, I wanted to try something I had been meaning to try for ages, since I tasted it for the first time in my friend Harini’s home almost 10 years ago. This is a typical Telangana dish that Harini made for us for dinner one evening and the dish was so flavorful it stuck. Simple to make yet I somehow never got to really try it in my own kitchen until this week. This pulusu or broth is fully raw and needs no heating or boiling. It’s the tadka or popu or tempering that gives it its unique kick and flavor. The tartness of the tamarind and spice of the red chili with garlic along with a hint of jaggery and a secret ingredient to finish is what makes this dish different from any rasam/pulusu you may have tasted . Eat it with hot rice, ghee and mudda pappu or thick spiced tuvar dal and it is a combination that will live on your taste buds for a long long time.Like it did for me for over a decade:). This recipe is Harini’s contribution to Roz Ka Khana and though I’m sure it doesn’t come close to the way she or her in laws make it in their home, it hopefully is a decent first attempt. .

Ingredients for Pachi Pulusu:

Serves 4. Prep time : 15 minutes. Cooking time: 10 minutes

  • Tamarind – 1 small lemon sized ball, soaked in warm water.
  • Jaggery – 1/2 tsp
  • Fore tempering:
  • Mustard seeds- 2 tsp
  • Cumin seeds (jeera) – 1 tsp
  • Dry red chilies – 3-4
  • Green chili – 3-4 sliced thin
  • Red onion, chopped fine – 1/4
  • Garlic, crushed or chopped fine – 3 small or 2 big
  • Curry leaves – a sprig
  • Roasted sesame seed powder – 1 tsp
  • Cilantro, chopped – 1 bunch
  • Cream or whole milk – 1 tsp (optional)
  • Oil- 2 tsp
  • Salt to taste

Method:

  1. Squeeze the juice from the soaked tamarind and add enough water to it to make about 2 cups. Add salt to taste and the jaggery and mix well.
  2. Heat oil in a small pan, when hot add the mustard seeds. When they splutter, add the jeera, red chilies and curry leaves. Add garlic, green chilies. Saute for 1 minute.
  3. Pour the tempering over the tamarind water. Add chopped onions and cilantro for garnish.
  4. Add the roasted sesame powder.
  5. As a final touch, add 1 tsp of cream or whole milk and give it a quick mix before you serve. (The cream compensates for the tartness of the tamarind. You can avoid this step if you don’t like the idea of adding milk to the pulusu or are vegan).

Serve with rice, ghee and pappu (yellow tuvar dal tempered with mustard seeds, jeera and curry leaves). It’s called “mudda pappu” as it is meant to be thick when mixed with rice so the pulusu is a runny and tangy accompaniment. According to Harini, spinach dal (paalak pappu) and moong dal spiced are also great accompaniments for pachi pulusu. Will try that next and let you know:)

Coming up next for Rasam week is Inji (Ginger) Rasam.


Post Navigation